Number Series
The Number Series screen provides you with the ability to create customized number sequences for auto-generation. Enabling the Automatic Employee Numbers on the settings screen will activate the Number Series feature. This functionality can be useful for maintaining systematic and consistent identification numbers.
For example, it will help you to establish a standardized format for generating employee identification numbers that follow a logical sequence. This will ensure that the assigned numbers are structured and consistent which will in turn make it easier to manage and track employee records effectively.
- To access the Number series screen, click on the link provided on the Settings screen.

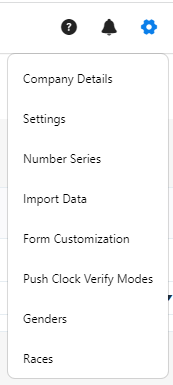
- Or click on the gear “
 ” icon on the top right corner of the application and click Number Series.
- Set Number Series For - Select Employee Number.

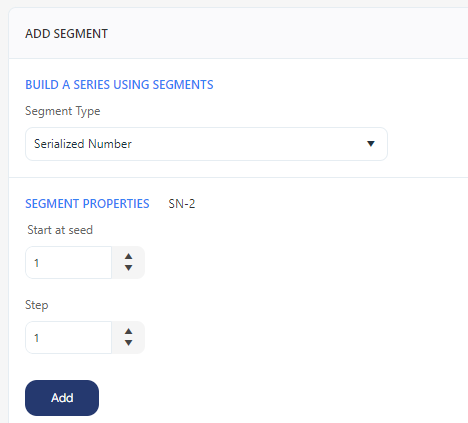
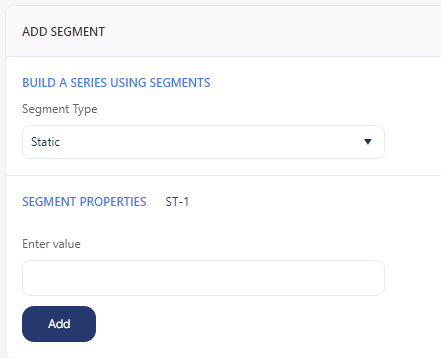
- Add Segments - Choose segment Type. The two options are serialized number and static.
Serialized Number
- Start at seed - Enter the starting value for the number series.
- Step - Enter how many steps (1,2,3, etc.) you want the sequence to advance each time. For example, if you enter '1' in the Start at Seed field and enter "1" in the Step field, each label will advance by one number.
Static
- Enter Value - Enter the value or text. For instance, if you want every employee number to begin with "emp-", then enter EMP-.
- The number series preview appears in the "Preview the series" section.

- Click Add.
- The newly added number series will show in the bottom grid. Review it. Click Save.

- To update the number series, double-click on the line item, and the "Add Segment" section will populate the entered values. Edit the entry and click on Update. Click Cancel to undo the changes.

- To remove the number series, select the line item and click on Remove. Click on Yes on the confirmation screen.
Note - The Remove button will be disabled.

- Click Save. A message will appear indicating that the employee number format successfully saved.