Add Roles
The New Role feature allows you to create a new employee role with specific permissions and access levels. This can include setting permissions for viewing, adding, editing, and deleting, as well as performing other actions, such as generating reports or managing other users. Once a role is created, you can assign employees to that role, which will automatically give them the permissions assigned to that role. This feature allows you to create custom roles that are tailored to the specific needs of your organization.
Note: An employee can only have one role.
Click Roles below Setup.

Click New. The screen will navigate to the New Role screen.

The New Role screen has two tabs - Role Details and Permissions.

Role Details
To add a role, enter the following details:
- Role (Required) - Enter the name of the role.
- Role Description (Optional) - Enter a brief description. It can be anything like a role overview, explaining the activities or responsibilities of the employees assigned to this role, skills and knowledge required, etc.
Add Employees to a Role
The Add Employees to a Role grid lists all the employees added in the application.
- Show All Employees / Employees with Application Access - You can switch between "show all employees" and "employees with application access".
- Show All Employees lists all the employees. All the employees include inactive employees, who can access the application, and those with no access to the application. This is the default setting.
- Employees with application access list only the active employees. Active employees are the employees who can access the application.
- Filter - Each column on the view screen has a sorting and a search option. You will see a search text box in each column where you can type and search. You can enter single/multiple terms across different columns and the application will apply all search criteria to filter the data, showing the rows (on the top) that match all the selected criteria. This feature provides users with a more precise and granular way of filtering data, making it easier to navigate and find the information they need.
- You can use the filter funnel icon to select - Starts with, Is equal to, Is not equal to, Contains, Does not contain, and Ends with.
- Filter/Sorting Applied - This feature is an indicator in the application to show you that sorting or a filter/set of filters has been applied to a list. This indicator can help users keep track of the filters that are currently in use and understand which items are being displayed because of those filters.
- Assign Role - To add an employee to a role, check the checkboxes to select the employees. Another way to assign a role to an employee is through the Employee screen. The employee screen provides a provision to assign a role to a newly created employee or existing employee.
Note: An employee can have only one role. The checkbox will be disabled for employees who are not invited or with no application access.

- User Name - The user name column displays either the username and Enable Access link, or it will be empty.
- The user name appears when the employee accepts the invitation and has completed registration. The user record status will display Accepted.
- The Enable Access link appears when the user does not have application access. The user record status will display Denied.
- The empty column indicates that the invitation has been sent, but the employee registration is pending. The user record status will display Pending.
- Enable Access - An Enable Access link will appear for the employee who does not have application access. The "Employee will access the application" is a checkbox in the Application grid on the New/Edit Employee screen. This checkbox on checked provides application access to an employee, i.e., they can log in to the application and use the assigned features depending on their role. To
- Click on the Enable Access link.
- The screen navigates to the View/Edit Employee screen.
- Verify or enter a valid email address.
- Check the "Employee will access the application" checkbox.
- Click Save.
- The screen navigates to the View Employee screen.
- Department and Manager - The department and manager details appear if the details are added while adding the employee information on the New/Edit Employee screen.
Site Restriction
The Site Restrictions feature enables you to restrict specific sites for a role, subsequently affecting the employees assigned to that role. When a role, and thereby an employee, is restricted from a site, the site will not be visible in any site field across all screens.
Note that this feature is designed focusing particularly on roles within an organization, which could have two types of access:
- Access to All Sites: Some roles within the organization might require access to all available sites.
- Access to Specific Sites: Other roles may only need access to certain specified sites. In this case, the access is not granted to all sites but is limited to a predefined list of sites.
Only users such as admins and managers who have access to the add/edit Role feature can implement these restrictions.
To enable the site restriction:
- Select the 'Enable site restrictions' checkbox.
- Choose the sites. Please note that the chosen site(s) will be allowed, and any unselected site will be restricted.
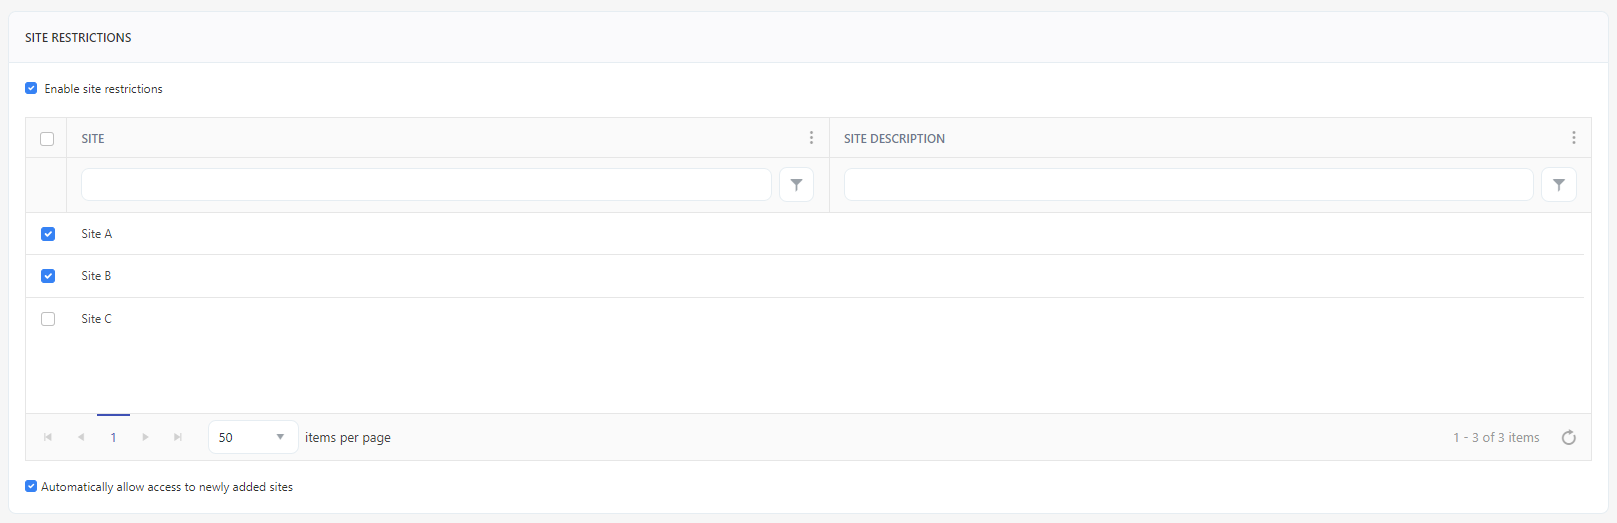
- Optionally, click on the 'Automatically allow access to newly added sites' checkbox if you want to automatically assign newly added sites to a role.
- Click Save.
- Example: Consider you are creating a role such as 'Site Administrator' and assigning an employee to it. You can enable site restrictions and select the list of allowed sites. Let's assume the site administrator has access to Sites 'A' and 'B.' Consequently, when the site administrator creates or edits an employee and attempts to assign a site, the dropdown menu will only display the allowed sites. The same principle applies to the Clock screen. When you access the Employee or Clock screen and try to assign a site, you will see only Site A and Site B.
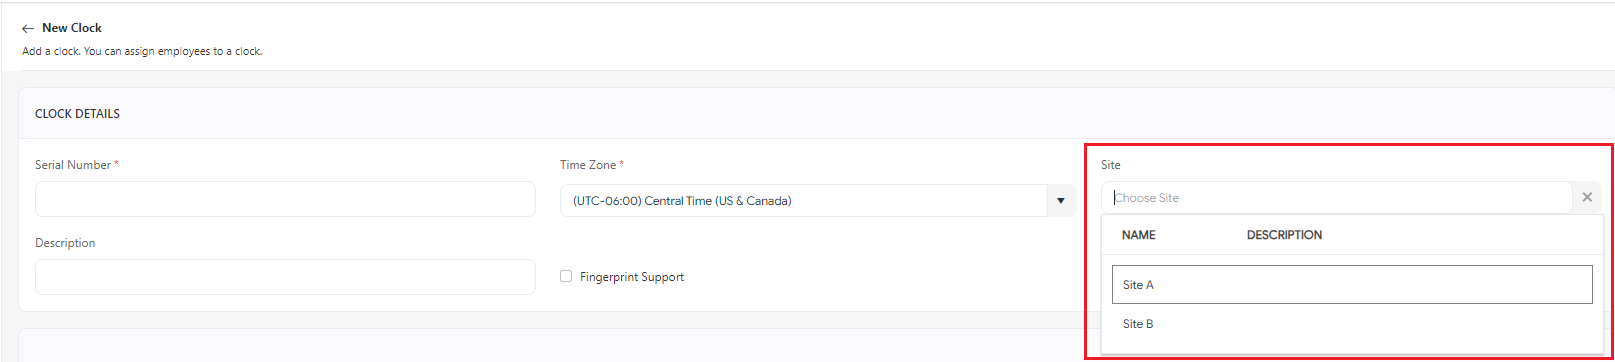
The related topics are Sites, Employees, and Clock.
Permission
The Permissions tab allows you to control access to the application and its features by setting employee roles and permissions. This can include specifying which employee can view, add, edit, or delete, as well as which employee can perform other actions, such as generating reports or managing other users. By setting these permissions, you can ensure that only authorized employees can access the application and functionality they need to perform their jobs effectively.
For more details, refer to the topic Permissions.
Click Save. Click Cancel to navigate to the View Roles screen.