New Schedule Template
The new schedule template screen allows you to create schedules. Each schedule creation includes adding an expected clock in time, clock out time, defining in-out rules, clock rounding, and adding rest and meal breaks. This allows you to establish more than one set of rules for paying employees who fall into a variety of payment categories, such as exempt, non-exempt, night shift, normal shift, and contract workers.
To add a new schedule template, click on Schedule Templates below Setup.

Click on New Schedule Template.

The new schedule template has 4 sections - General Details, Schedule, In-Out Rules, Meal Breaks, and Rest Breaks.
General
- Schedule Name (Required) - Enter the schedule template name. The schedule template name is mandatory.
- Description - Enter a brief description.
Schedule
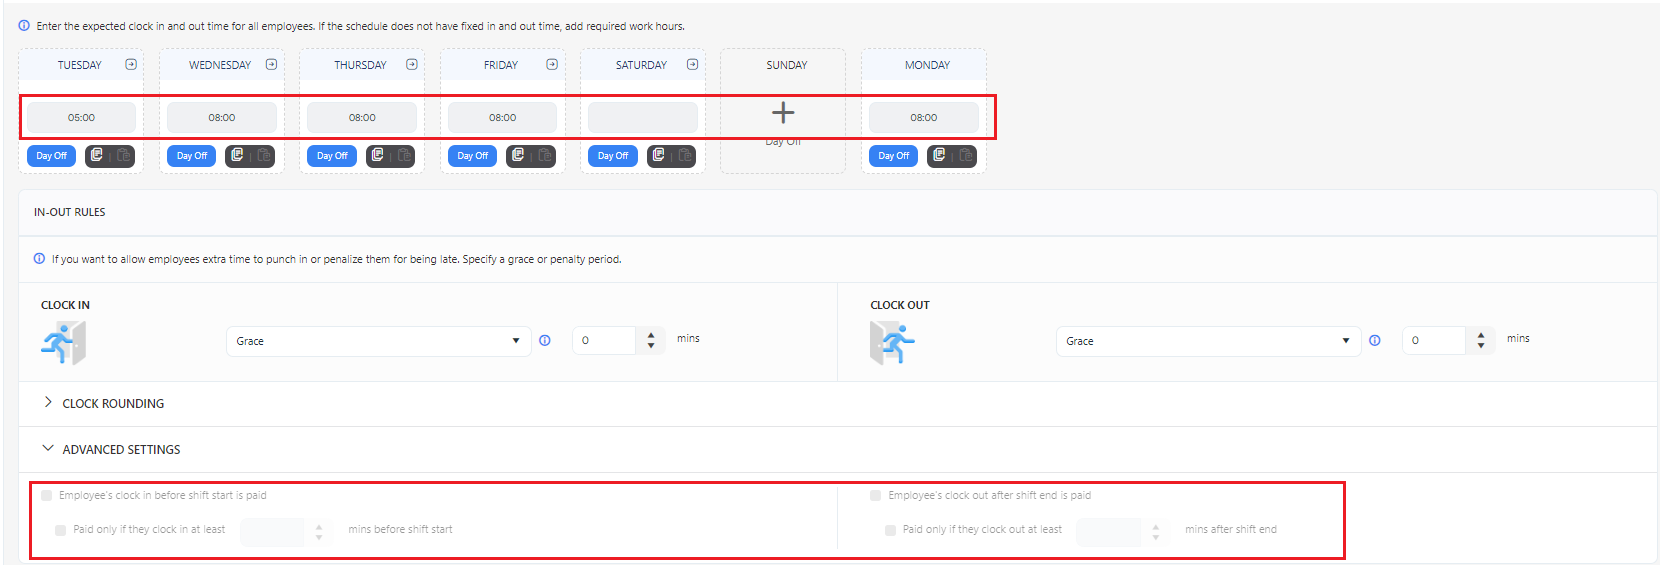
Enter the expected clock in and out time for all employees. Add the required work hours if the schedule does not have fixed in and out time. Note that you can set the first day of the week in the Pay Period Settings screen.
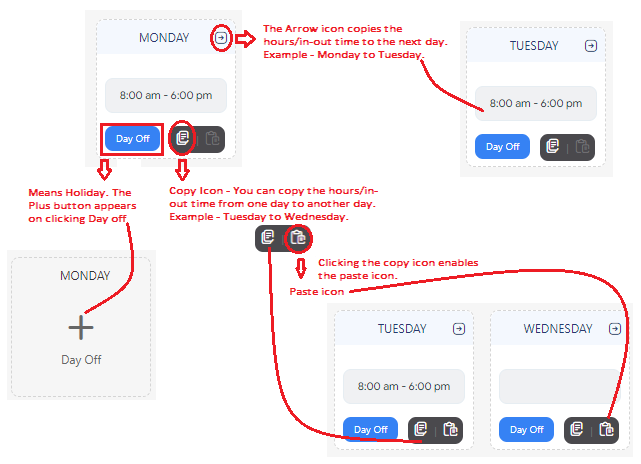
- Initially, you will see a Plus button on all days. The Plus button indicates Day Off.

- To add an entry, click on the Plus button. For example, consider that we are adding a morning schedule for which the clock-in-out time is 8:00 a.m. - 6:00 p.m. and Friday is flexible hours.

- Day Off
- The Plus
 icon indicates Day Off.
- Click on the plus icon to enter the hours/in-out time.
- To switch back to Day off, click on the
 button.
- Arrow Icon
- Click on the icon to view the arrow button.
- Enter the hours/ clock in-out time.
- Click on the arrow
 icon.
icon.
- It will copy the hours/ clock in-out time to the next day.
- Copy Icon & Paste Icon
- Click on the icon to view the copy icon.
- Enter the hours/in-out time.
- Click on the copy
 icon to copy the entered value.
- Clicking on the copy icon enables the paste
 icon.
icon.
- Click on the paste icon to paste the value to another day.
- Enter the in-out time either manually or using the icons/buttons provided. Note that you can add flexible hours too. Flexible hours define the total hours to be worked per day. There will be flexibility in the in-out time. To add a flexible hour, enter a number. Refer to the screenshot below - Friday - 8 means the employee should work 8 hours on Friday.

In-Out Rules
The In/Out Rules tab allows the user to set rules governing Clock In/Out times. New schedule templates do not round by default. The usual use for rounding is to encourage employees to arrive and leave on time. Check with local and national rules about what rounding is allowed.
There are two sections - Clock In and Clock Out.
- Clock In and Clock Out
- Grace Period - Select "Grace" from the dropdown options and enter the grace period in minutes. This applies to both clock in and clock out.
- The grace period is the time in minutes that an employee can arrive late or leave early without penalty. If the user arrives late or leaves early within the grace period, their actual time will be shown on the timecard, but they will be paid for the full time based on the work schedule. For example, consider that the employee's schedule is 7 a.m. to 5 p.m. and the grace period is set to 15 minutes. Now if an employee clocks in at 7.10 then he/she will get paid as the clock-in time was 7 a.m. and 15 minute grace period is allowed. This feature is often used if there are many people using one clock all at the same time and you don't want to penalize people for having to wait in line. It can be used with rounding to penalize people who are late, but the Grace Period will be applied before any rounding.
- Penalty Period - Select "Penalty" from the dropdown options and enter the penalty period in minutes. This applies to both clock in and clock out.
- The penalty period is the time in minutes (up to 60) that an employee will be penalized for arriving late or arriving early. If employee clocks in late or out early, they will be paid for the actual punch times on the timecard. For example, consider that the employee's schedule is 7 a.m. to 5 p.m. and the penalty period is set to 15 minutes. Now if an employee clocks in at 7.15 a.m. the employee will be paid starting at the punch time of 7:15.

- Clock Rounding - In Rounding and Out Rounding
- In Rounding - The options are - None, 15 minutes, 5 minutes, 6 minutes, and Custom.
- Out Rounding - The options are - None, Same as clock in, 15 minutes, 5 minutes, 6 minutes, and Custom. When the "out rounding" is the same as "in rounding", choose the option "same as clock in".
The related topic is Rounding > Rounding Options.
- Advanced Settings
- Employee's clock in before shift start is paid - The checkbox will be checked by default. Keep it checked if you want the employee to be paid if they clock in before their actual shift start time. Uncheck to disable the settings.
- paid only if they clock in - mins before shift start - Enabled only if the "Employee's clock in before shift start is paid" is checked. Enter the minutes. The default limit is set at 0 minutes, with the minimum and maximum limits ranging from 0 to 120 minutes, respectively. For example, the statement 'Paid only if they clock in at least 120 minutes before shift start' means that the employee will only be paid if they clock in at least 120 minutes before the start of their shift. This implies that they are compensated for early clock-ins that occur more than 120 minutes before the scheduled start time.
- Employee's clock out after shift end is paid - The checkbox will be checked by default. Keep it checked if you want the employee to be paid if they clock out after their actual shift end time. Uncheck to disable the settings.
- paid only if they clock out - mins after shift end - Enabled only if the "Employee's clock out after shift end is paid" is checked. Enter the minutes. The default limit is set at 0 minutes, with the minimum and maximum limits ranging from 0 to 120 minutes, respectively. For example, the statement 'Paid only if they clock out at least 120 minutes after shift end' means that the employee will only be paid if they clock out at least 120 minutes after the end of their shift. This implies that they are compensated for clocking out late, as long as it exceeds the 120-minute threshold after the shift's end.

Note: The Advanced settings will be disabled for the flexible hours schedule. The Flexible hour is the total hours to be worked per day and the in-out time will be flexible. However, if the employer mandates specific clock-in and clock-out times for even one day, the advanced settings become accessible.
Rest Breaks
You can add up to 2 rest breaks. The sequence of adding breaks is Rest Break 1, Meal Break 1, Rest Break 2, and Meal Break 2.
- Click on the Add Break button. Add Rest Break 1.

Enter the following details:
- Break Name - You have the option to modify the name of the rest breaks. Click on the pen icon and enter a new name. This name change applies only to the schedule template you are currently creating.

- Break Type - The options are Paid, Unpaid, Paid Limited, Unpaid Minimum, and Unpaid Minimum Unless Eligible. The related topic is the Definition Of Rest/Meal Break Type Options.
- Duration - Enter the scheduled duration. This field will be disabled for the "paid" option. It is mandatory for break types other than paid.
- Automatic Deduction - This is applicable for Unpaid, Unpaid Minimum, and Unpaid Minimum Unless Eligible.
- Daily Eligibility - There are two types of eligibility - Daily and Prior Accumulation. The related topic is Daily and Prior Accumulation.
- Eligible For Break After - Enter the time that the employee needs to work to be eligible to take this break.
- The Rest Break 2 can be added only after adding Meal Break 1. Add Meal Break 1 and then click on + Rest Break 2 to add one more rest break.
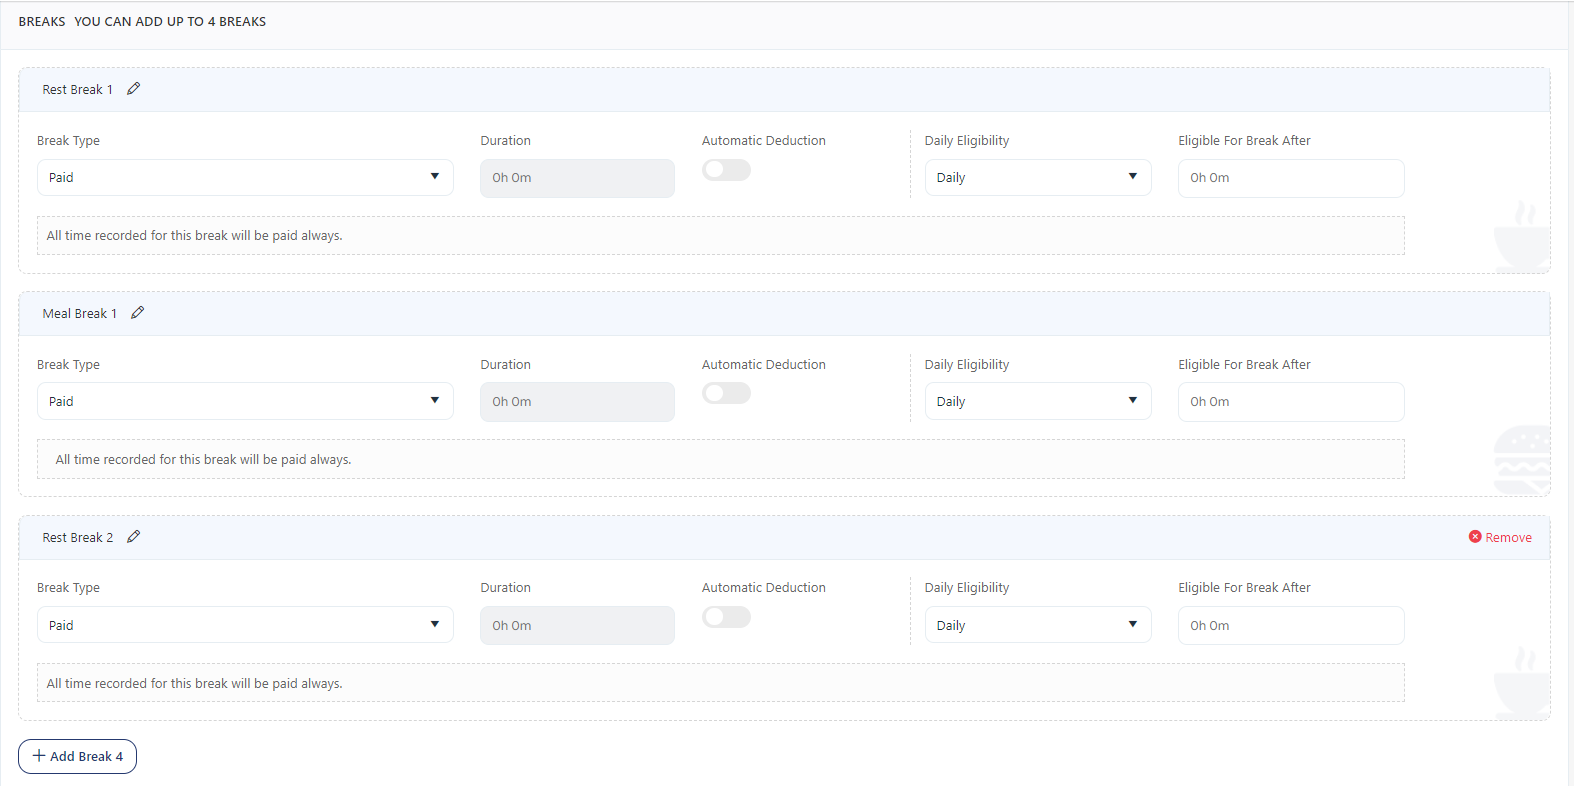
- Break Rounding - Select the rounding options. The options are - None, 15 minutes, 5 minutes, 6 minutes, and Custom. The related topic is Rounding > Rest /Meal Break Rounding > Rounding Options.

Note: The sequence of removing the break is Meal Break 2, Rest Break 2, Meal Break 1, and Rest Break 1. Use  button to remove a break.
Meal Breaks
You can add Meal Break 1 after adding Rest Break 1. You can add up to 2 meal breaks.
Note: The sequence of adding breaks is Rest Break 1, Meal Break 1, Rest Break 2, and Meal Break 2.
- Click on the Add Break button to add Rest Break 1.
- Click on Add Meal Break.
- Break Name - You have the option to modify the name of the meal breaks. Click on the pen icon and enter a new name. This name change applies only to the schedule template you are currently creating.
Enter the following details:
- Break Type - The options are Paid, Unpaid, Paid Limited, Unpaid Minimum, and Unpaid Minimum Unless Eligible. The related topic is the Definition Of Rest/Meal Break Type Options.
- Duration - Enter the scheduled duration. This field will be disabled for the "paid" option. It is mandatory for break types other than paid.
- Automatic Deduction - This is applicable for Unpaid, Unpaid Minimum, and Unpaid Minimum Unless Eligible.
- Daily Eligibility - There are two types of eligibility - Daily and Prior Accumulation. The related topic is Daily and Prior Accumulation.
- Eligible For Break After - Enter the time that the employee needs to work to be eligible to take this break.
- Meal Break 2 can be added only after adding Rest Break 2. Add Rest Break 2 and then click on + Meal Break 2 to add one more meal break.
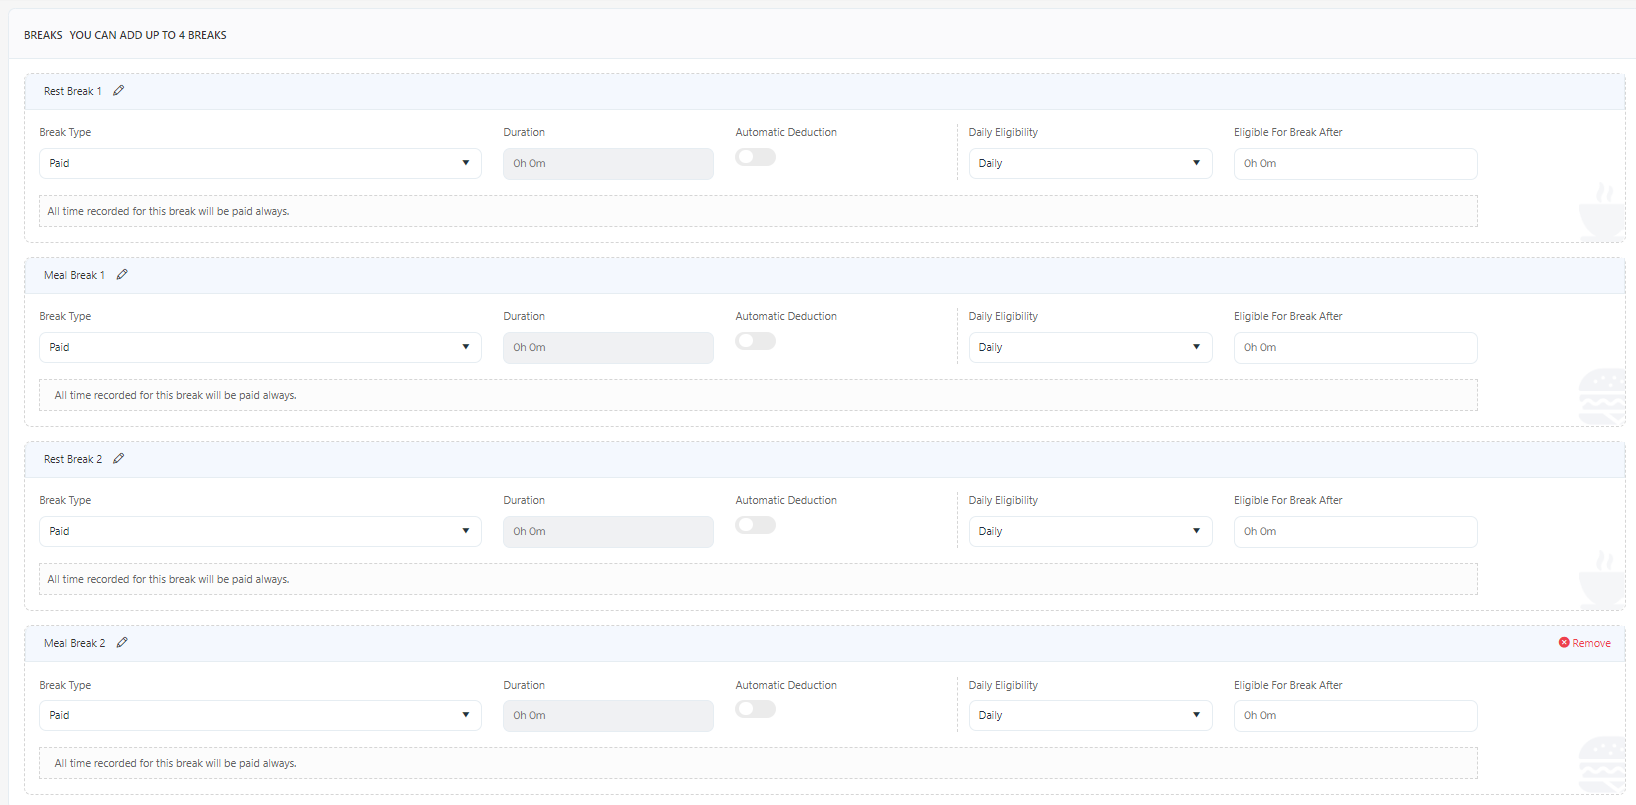
- Break Rounding - Select the rounding options. The options are - None, 15 minutes, 6 minutes, 5 minutes, and Custom. The related topic is Rounding > Rounding Options.
Note: The sequence of removing the break is Meal Break 2, Rest Break 2, Meal Break 1, and Rest Break 1. Use button to remove a break.
Click Save to save the schedule template. Use cancel to cancel the changes and to navigate back to the View Schedule screen.
Rounding
In-Out Rounding - The in and out times are each rounded up or down independently based on program settings.
Rest /Meal Break Rounding - rest and meal breaks are usually dealt with as an amount of time allowed, rather than a scheduled time. Because of this, the rest and meal breaks are rounded according to the time taken, not the time the meal or rest break started and ended. If you require an employee to take a meal or break of a certain duration, the software does track and round based on the meal or break duration.
Rounding Options
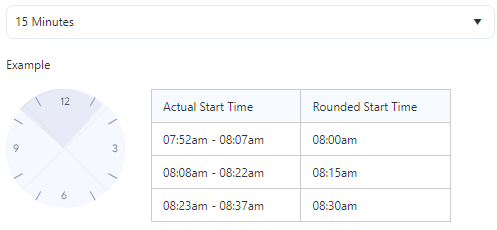
- 15 minutes (1/4th of an hour) - Rounding to 15 minutes (OR 1/4 hour) observes two thresholds that indicate whether the clock-ins and clock-outs are rounded up or down. The first 7.5 minutes are always rounded down while the second-half 7.5 minutes are rounded up to a full quarter of an hour.
- 5 minutes - 5-minute rounding splits every 5 minutes into two parts of 2.5 minutes. When an employee clock in or out in the first 2.5 minutes of that timeframe, time is rounded down. For the second half, the time is rounded up to the nearest 5 minutes.

- 6 minutes (1/10th of an hour) - Rounding to 1/10th of an hour uses 6-minute increments, each split into 3-minute intervals. For every 3 minutes after each 6-minute increment, time is rounded down. The second half of the interval rounds up to the nearest 6 minutes.
- Custom - The custom option allows you to enter Round To and Round Up After time. Set the time interval to round, as well as the cut-off point for rounding up.
- Example: If the "Round To" was set to 15 (minutes), and the "Round-Up After" was set to 7, the following rules would apply: An employee clocks in at 7:51 - time is rounded to 7:45. An employee clocks in at 7:52 - time is rounded up to 8:00 (7:45 + 7 minutes). This rounding happens on the final calculation of the time. The actual clock in and out times will be shown on the timecard.

Definition Of Rest/Meal Break Type Options
- Paid - Time categorized as paid will be paid and will be included in overtime.
- The duration of a paid break or meal is not considered. The whole break or meal is always paid.
- If a meal or break is paid, there is no reason for it to be automatically deducted because there is nothing to deduct. It can be subject to eligibility.
- If a paid meal or break is not eligible, it will not be paid.
- Unpaid - Time categorized as unpaid will not be paid or included in overtime.
- The duration of an unpaid break or meal is considered only if the break or meal is automatically deducted.
- The whole meal or rest break is unpaid regardless of duration if there are actual punches for the meal or rest break.
- Eligibility for an unpaid meal or rest break is only considered if the meal is automatically deducted. If punches for the meal or rest break are made, eligibility is not considered but if there are no punches and the employee is not eligible, no break will be automatically deducted.
Example
- An unpaid meal is set up for 30 minutes. If the employee punches out for 35 minutes, the entire 35 minutes will be deducted. If the employee only takes a 10-minute meal, only 10 minutes will be deducted. If, however, the meal is automatic, and the employee takes 35 minutes but does not punch out, only 30 minutes will be deducted since there is no way for the program to know the actual meal length.
- Paid (Limited) - Time categorized as paid limited is paid up to the duration of the break or meal and then the rest is unpaid.
- Paid limited meals or rest breaks are never automatically deducted.
- Paid limited meals or rest breaks can be subject to eligibility. Here, if an employee is not eligible for a paid meal or rest break, the entire duration of the meal or rest break will be deducted.
Example
- If an employee is allowed a 30-minute paid break and takes 35 minutes, the timecard will show a 5-minute deduction.
- Unpaid (Minimum) - Time categorized as Unpaid (Minimum) always deducts a minimum number of minutes from the employee each day that the employee is in.
- Eligibility is not considered unless the automatic deduction is on and no punches are registered for this meal or rest break. Here, the deduction will only be applied if the employee did not punch out for the meal or rest break and is eligible. If the employee punches out and in for this meal or rest break, the unpaid minimum rules will always apply, even if they are ineligible.
- This type is automatically deducted by default. Deselecting the Automatic Deduction checkbox will cause eligibility to be disregarded and will mean that employees who do not punch out will not get any deduction.
Example
- If the meal or break is set up as unpaid minimum for 30 minutes and an employee punches out and in for 35 minutes, the entire 35 minutes is deducted. If the employee punches out for 10 minutes, 30 minutes is deducted. If an employee does not punch out, 30 minutes is deducted if Automatic Deduction is selected.
- Unpaid Minimum Unless Eligible - Time categorized as Unpaid Minimum Unless Eligible always deducts a minimum number of minutes from the employee each day that the employee works unless they are eligible in which case the lunch is paid.
- Eligibility is not considered unless the automatic deduction is on and no punches are registered for this meal or rest break. Here, the deduction will only be applied if the employee did not punch out for the meal or rest break and is not eligible. If the employee punches out and in for this meal or rest break, the unpaid minimum rules will always apply even if he is eligible.
- This type is automatically deducted by default. Deselecting the Automatic Deduction checkbox will cause eligibility to be disregarded and will mean that employees who do not punch out will not get any deduction.
Example
- If the meal or rest break is set up as unpaid minimum for 30 minutes and an employee punches out and in for 35 minutes, the entire 35 minutes is deducted.
- If the employee punches out for 10 minutes, 30 minutes is deducted.
- If an employee does not punch out, 30 minutes is still deducted if the Automatic Deduction checkbox is selected and the employee is ineligible.
- If the employee is eligible and will be paid for up to 30 minutes. The time over 30 minutes will be deducted.
Daily and Prior Accumulation
- Prior Accumulation means that prior to the time that the meal or rest break is taken (If there are punches) the employee must have the "Time Required" accumulated. If the "Time Required" is not accumulated, then they will be ineligible for that meal or rest break.
Example
- For example, if the prior accumulation is set to 2 hours for a meal break. The employee clocks in at 8:00 a.m. then they should work for 2 hours i.e. till 10:00 a.m. to take a meal break.
- Daily Accumulation means that if the "Time Required" is not accumulated by the end of the day, i.e. the clock out time, the employee is ineligible for that meal or rest break. All time is considered eligible from the first clock-in to the last clock-out for the meal or rest break.
Example
- For example, if the "Daily" accumulation is set to 8 hours. The employee clocks in at 8:00 a.m. and clocks out at 5:00 p.m. The employee has 9 hours of eligibility and is eligible for a meal or break.
- If the employee took an hour and a half meal in the middle of the day, that time is not deducted from eligibility unless it is not the break or meal being considered and is before the break or meal being considered.
Example
- If the employee took a 30-minute break and the hour-long meal that is under consideration, he will still have worked 8 hours and 30 minutes that day and will be eligible. If he took a one-and-a-half-hour break before the meal, the daily time would be 7 hours and 30 minutes and the employee would be eligible.
- If the 1:30 minute break came after the meal under consideration it is not included in the calculation because we would get into a looping problem where a break or meal after another break or meal cancels the prior break or meal that in turn cancels the later break or meal.