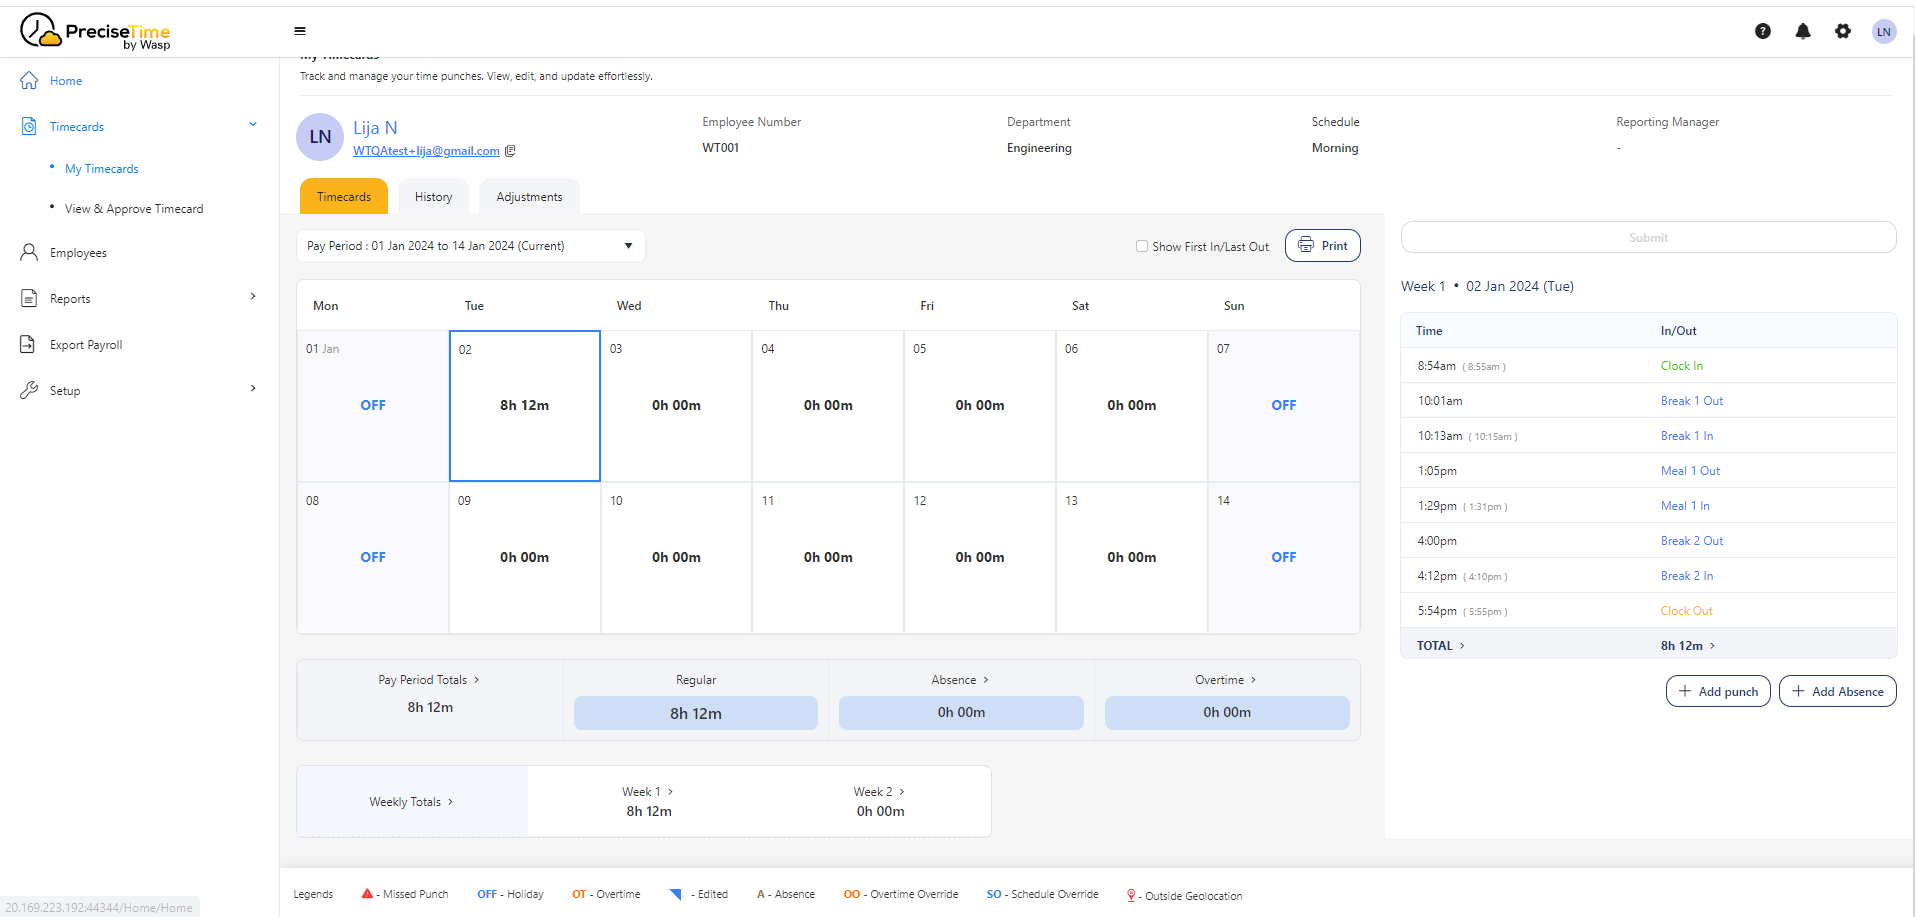
My Timecards
My Timecards allows you to view your timecard, i.e. the logged-in user's timecard. Depending upon the permissions, you can view, edit, add, and delete punches and absences. Once the timecard is corrected and ready for approval, you can submit it for further processing.
Accessing My Timecards
Prerequisites
General Details
Calendar
Clock In/Out Table
Pay Period Summary
Daily Summary
Additional features are:
Note - Refer to permissions to view timecard-related permissions.
Accessing My Timecards
Click on My Timecards below Timecards.

The Timecard screen will display current pay period punches by default.
You can view and manage your timecards.
Prerequisites
The following are the prerequisites for a timecard to work:
- If the time is captured from a physical clock, a clock must be assigned to an employee, and ensure that the employee's details are on the clock.
- A schedule must be assigned to an employee.
- A clock must be assigned to an employee and ensure that the employee's details are on the clock.
- The Pay Period Settings (type of pay period and/or the first day of the week) and the regular paycode in the Payroll Rules must be set.
- If not set, you will see a message indicating that the payroll and pay period settings are not configured. It needs to be set up before you clock in. Also, you will not be able to add punches or absences.

- Overtime will be displayed on the timecards only if overtime is configured on the payroll rules screen and an employee is assigned to a payroll rule.
- Time zone must be set on the employee and the clock screen.
- The timecard settings - Employee approval, Manager approval should be checked to enable employee/manager approval.
- The employee should have permission to view, edit, and delete their own punches and absences. Permissions assigned to a role determine functionality restrictions.
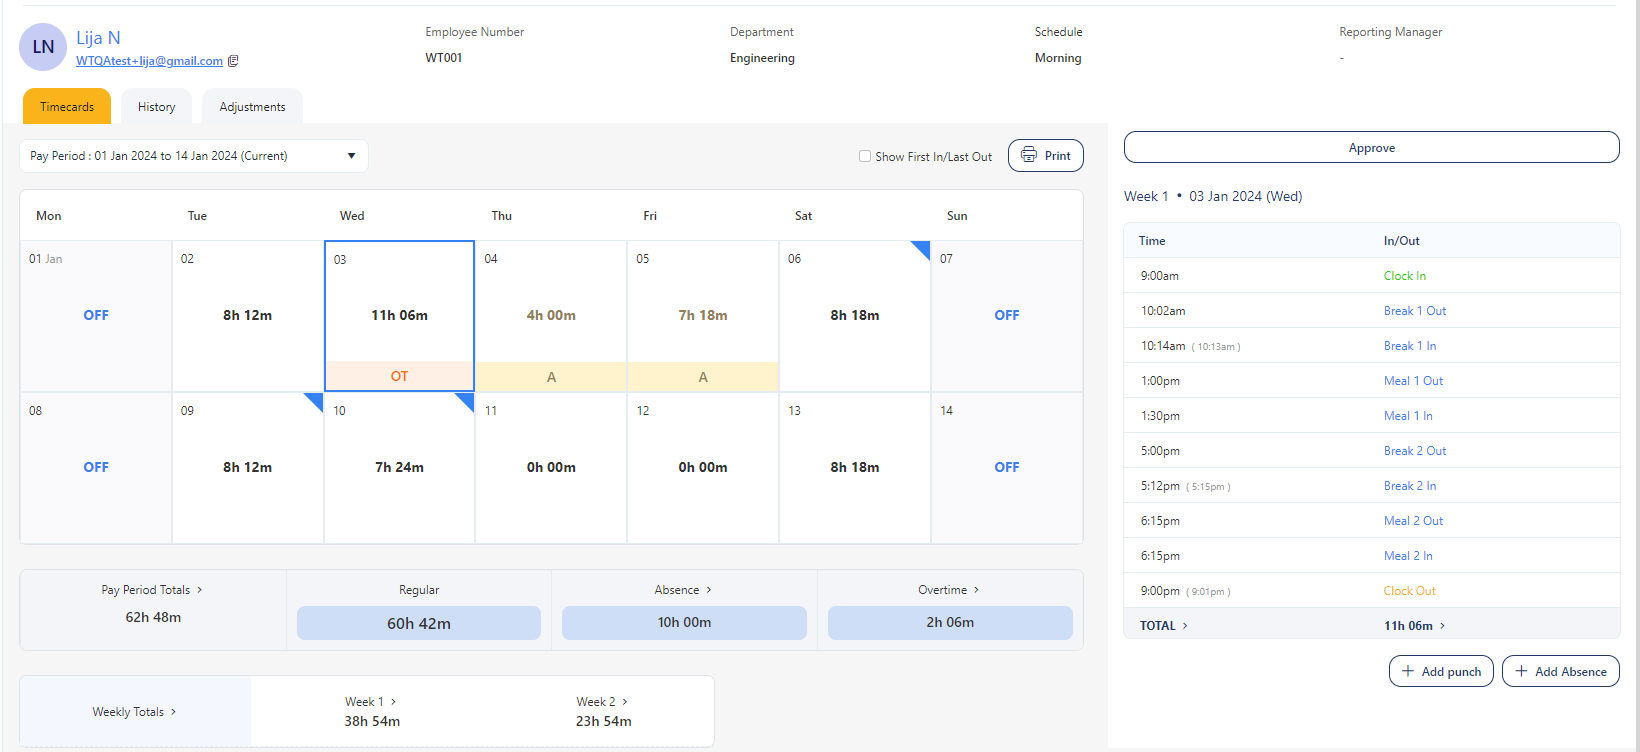
General Details
The section displays the employee's personal information, and they are:
- Name - Display your name.
- Email ID - Display your company ID. The email ID is hyperlinked, allowing you to select an app to open this in the "mailto" link and the copy icon to copy the email ID to the clipboard.
- Employee Number - Display your employee number.
- Department - Display your department name.
- Schedule - Display the schedule assigned to you.
- Reporting Manager - Display your reporting manager's name.

- Apart from personal information, you will also see the pay period and the date range.

Pay Period - It is a dropdown option where you can select the current pay period, next pay period, and previous pay periods. The default is the Current pay period. You can view up to 12 previous pay periods.
Pay Period Range - Based on the pay period selected, this field will display the pay period's start and end date.
- To switch to the previous pay periods, select any of the Previous date ranges. You can view up to 12 previous pay periods.

- Similarly, to view the next pay period, select the data range that has "Next" in it.
- Print Button - This button will allow you to print the timecard.
- The print-optimized version preserves all vital timecard information, such as dates, punch-in and punch-out times, breaks, total hours, and notes.
- The fonts, layout, and spacing will be adjusted to improve readability when printing the timecard.
- When choosing the print option within the browser (using Ctrl + P or Command + P), the print-friendly version is displayed in the print preview.
- The printed timecard is formatted to fit standard paper sizes like A4 or Letter, ensuring that no data is cut off.
- Any colors used in the print-friendly version are optimized for grayscale printing.
- Upon completing the printing process or closing the print preview, the user is seamlessly returned to the standard view of the timecard page.
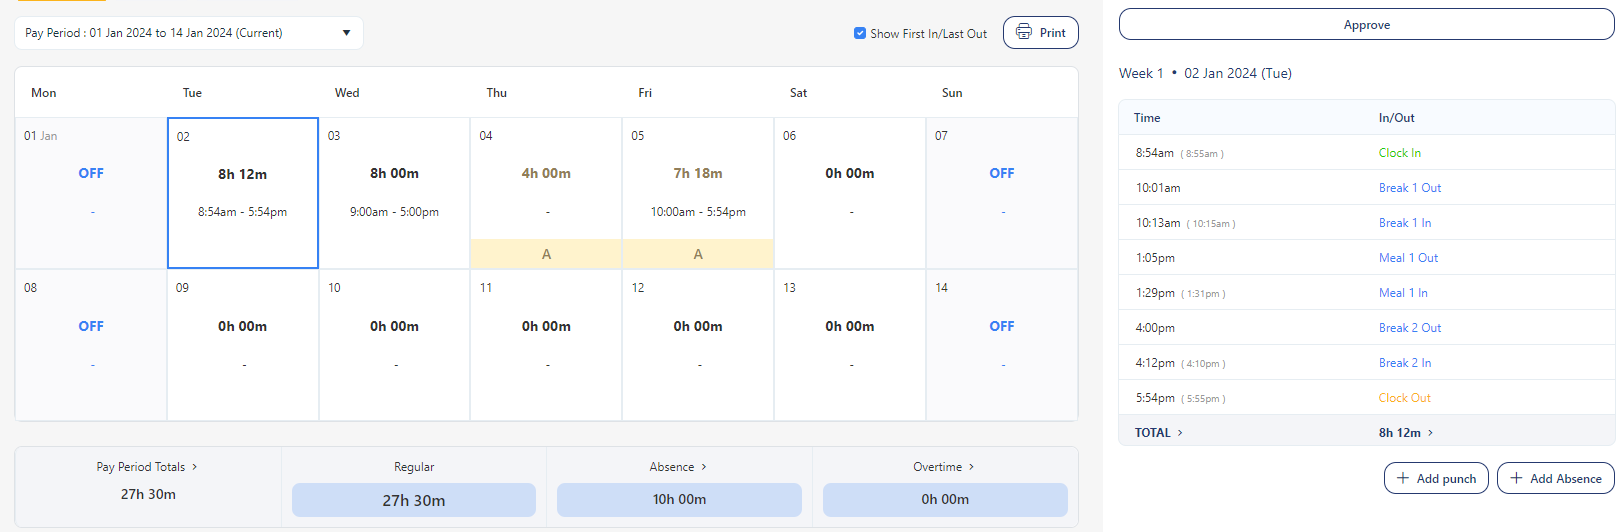
- Show First In/Last Out - This checkbox when checked will show the In and Out time on the calendar. By default, it is disabled. It will display only the initial clock-in time for a day if the employee hasn't clocked out, mark missed punches with an error icon for days with an odd number of punches, and for days of absence, present no clock-in or clock-out times.
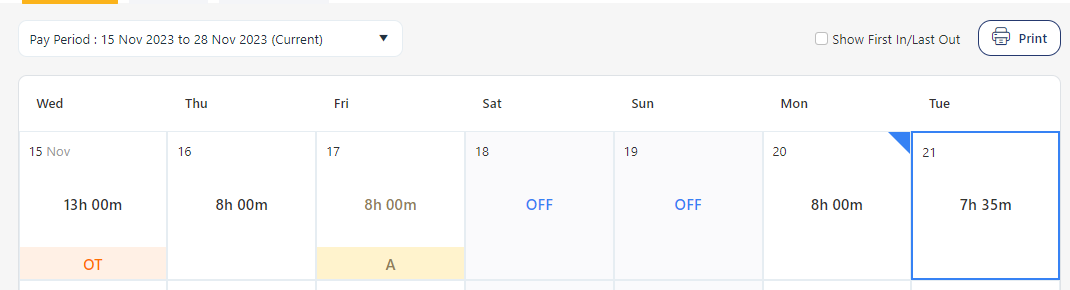
Calendar
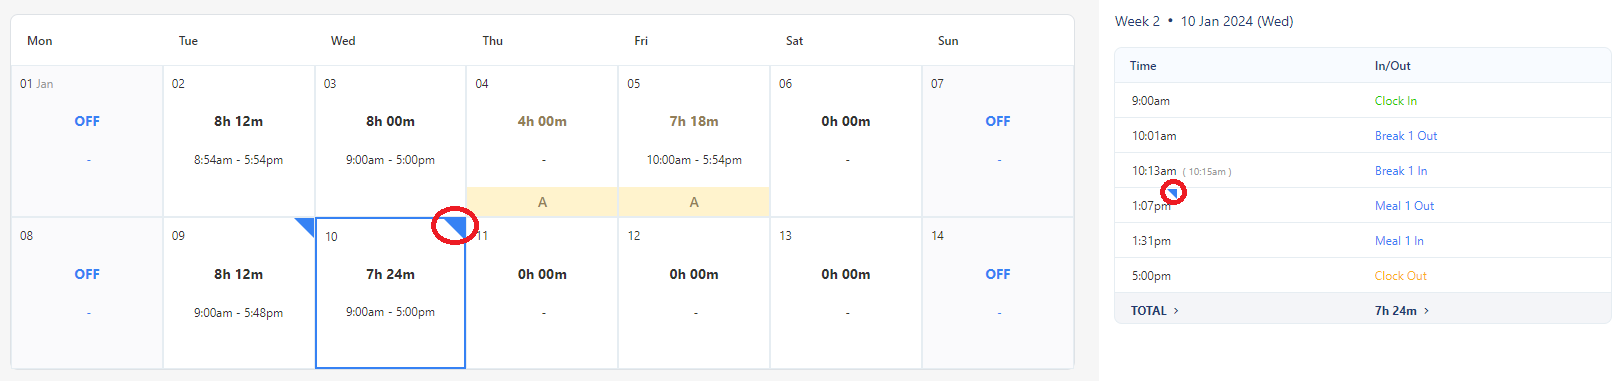
The Calendar gives a preview of total hours, days with missed punches, the day when the punch is edited, overtime, and off days.
Note: The pay period and the first day of the week depend on the pay period settings. Similarly, the schedule template assigned to an employee determines their hours and off days.
The calendar displays the following details:
- Total Time - The total time is the complete span of time from when an employee starts their shift to when they finish, considering all the scheduled breaks and pauses within that period.
- Missed Punch - Missed Punch refers to a situation where an employee forgets to clock in or clock out, i.e. the clock in/out table has no entry for the specific time when the employee should have punched in or punched out. When a missed punch occurs, the employee or their manager should rectify the missed punch. This may involve manually adding the missed punch. Refer to the Missed Punch topic.
Note that the missed punch will appear on the calendar according to the Missed Punch Alert Buffer settings. It is the duration that you have set for displaying the missed punch warning after the scheduled out time.
- Overtime - Overtime refers to the additional hours worked by an employee beyond their regular working hours. The overtime rules are set on the payroll rules screen. When an employee exceeds their regular working hours and fulfills the criteria for overtime hours, an OT label is displayed on the calendar. This display serves as a visual representation of the employee's work schedule, including both regular and overtime hours. Refer to the Overtime topic.
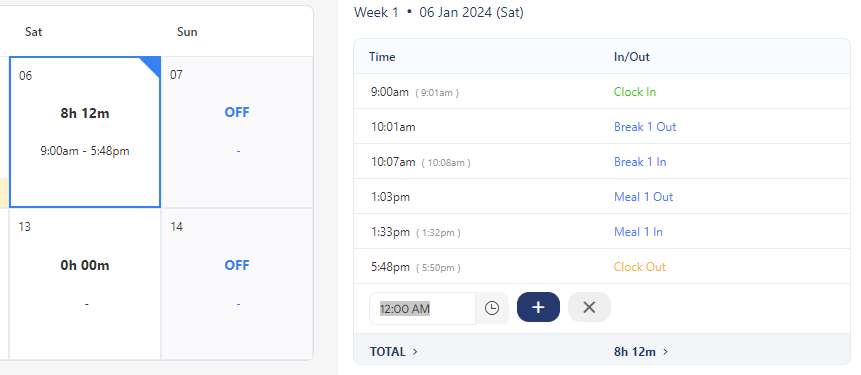
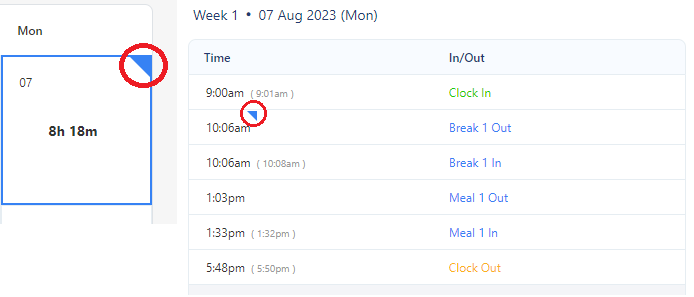
- Edited Time - Edited time refers to a modified (or deleted) or changed punch time entry for a specific day. When a punch time entry is edited (or deleted) on the clock in/out table for a specific day, a blue edit symbol (
 ) will appear on the top right corner of the calendar, indicating that changes have been made to that day's entry. Refer to the Edit Punch topic.
- Selected Day - The selected day will be highlighted in blue on the calendar.

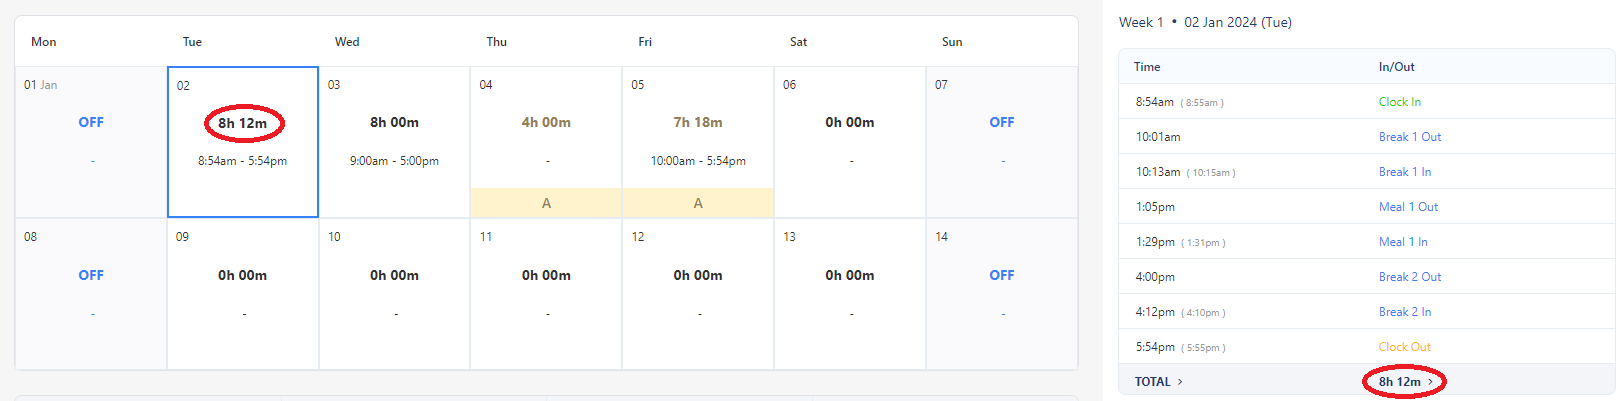
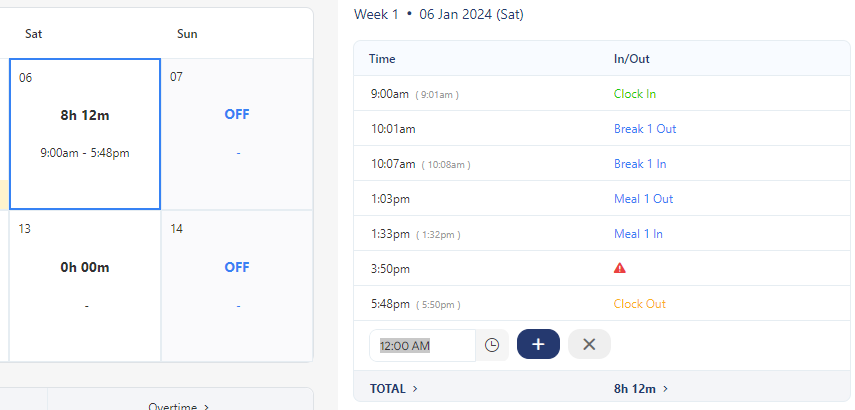
Clock In/Out Table
The table registers all the punch-in and punch-out information of the employees. This process typically involves employees punching in/out using the web clock in/clock out feature or using their unique identification, such as using a card, entering a PIN, or using biometric authentication like fingerprint or facial recognition. By default, the current date would be selected on the calendar and the table will show the punch details of the selected date.
To view the punch details, select a data.
The table will display the following information.
- Clock In - "Clock in time" refers to the designated hour when an employee is expected to report to work and begin their shift. This time can vary depending on the specific shift schedule and the policies of the organization. For example, an employee might have a clock-in time of 8:00 AM, which means they should arrive and be ready to start working at that time.
- Clock Out - "Clock out time" or "end time" refers to the designated hour when an employee's work shift is expected to conclude. This is the time when the employee is free to leave the workplace or complete their assigned tasks. For example, if an employee has a clock-out time of 4:00 PM, it means they are scheduled to finish work and can leave the premises at that time.
- Meal Out - Meal In - "Meal out" refers to the time when an employee punches to go out for a meal break. It signifies the start of their designated meal time. "Meal in" signifies the end of the meal break period, i.e. when the employee resumes their work after having their meal break. Note that you can edit the meal break names on the Schedule Template screen. Refer to the topic Schedule Template.
- Meal 2 Out - Meal 2 In - "Meal 2 out" and "Meal 2 in" refer to the second meal break taken by employees. These terms follow the same pattern as "meal out - meal in" but indicate the times for the second meal break. Note that you can edit the meal break names on the Schedule Template screen. Refer to the topic Schedule Template.
- Rest Out - Rest In - Rest breaks designate break times specifically allocated for tea or beverage breaks, allowing employees to rest and refresh during their work shifts. Rest Out means when the employee stepped out for a break and Rest In means when the employee resumes work. The same applies to "rest 2 out" and "rest 2 in". Note that you can edit the rest break names on the Schedule Template screen. Refer to the topic Schedule Template.
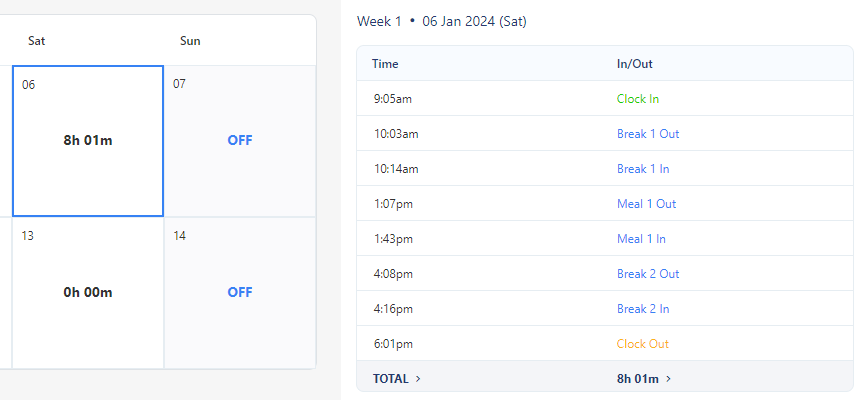
- Total - Total time refers to the overall duration or length of an employee's work shift, including all the components, such as a clock-in, clock-out, rest breaks, and meal breaks. It represents the complete span of time from when an employee starts their shift to when they finish, taking into account all the scheduled breaks and pauses within that period.
-
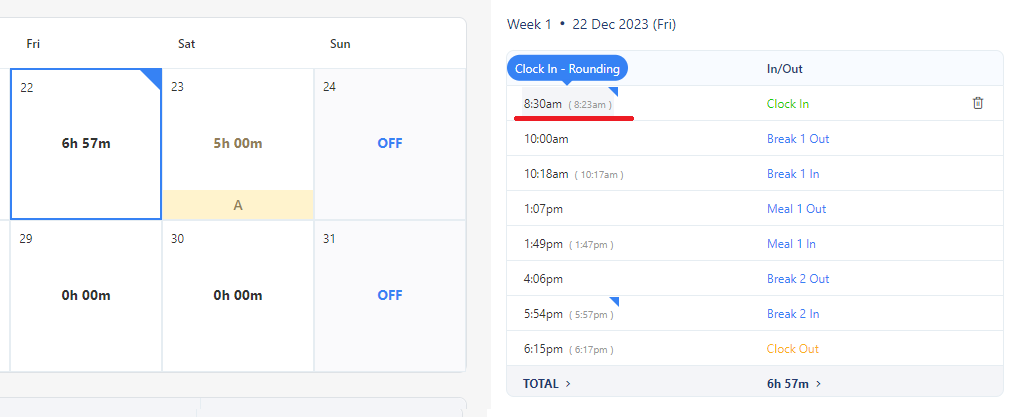
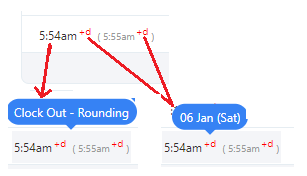
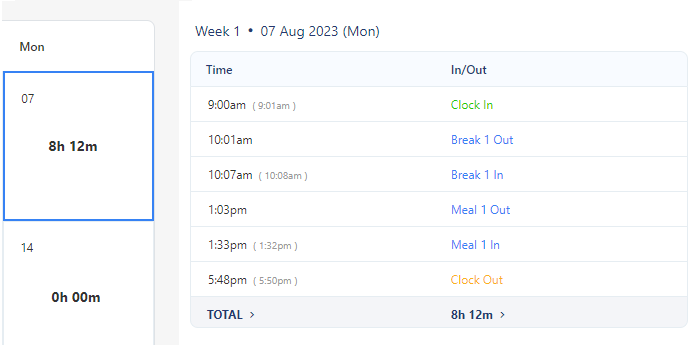
Rounding Rules - You can apply rounding rules to clock-in, clock-out time, and breaks (both rest and meal). If rounding rules are applied to any one or both of these, the table will display both the actual and adjusted (rounded) time. The actual time will be in brackets. The total will be the sum total of the adjusted time, which is outside the brackets. On hover, it will show the type of roundings i.e. Clock In rounding, Clouck out Rounding and break rounding. Refer to the topic Viewing Rounding Types and Time Adjustments for more information.
-
Missed Punch symbol ( )- Missed punch symbol appears when the table has an odd number of punches. An odd number of punches appear when an employee forgets to clock in or clock out.
-
Submit/Approve button - The submit or approve button appears based on the status of the "Manager Approval" and "Employee Approval" checkboxes. Refer to the Submit Timecard/Approve Timecard topic.
- Time zone - If you're accessing your punch records from a time zone other than your home time zone, a label will be shown above the table to indicate that your time zone differs from your employee time zone, and all your time entries will be saved based on your employee time zone. Refer to the topics - Home Time zone and Supported Time zone values.

Functionalities
-
Add New Punch - Add New Punch will allow you to add a punch if there is any technical issue, missed punch, discrepancies, etc. Refer to the
-
Edit Punch - The edited time refers to a modified or changed punch time entry for a specific day. The time is edited on the clock in/out table. Once edited for a specific day, a blue edit symbol () will appear over the edited time on the clock in/out table and on the top right corner of the calendar. Refer to the Edit Punch topic. Double-click over the time and you can edit the time.
-
Delete Punch - The trashcan appears when you hover over each row. Click on the Trashcan icon to delete any punch.
-
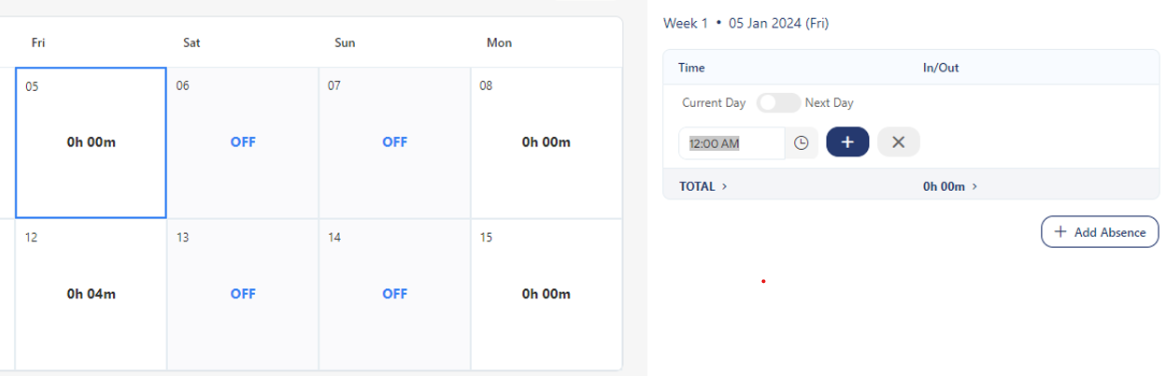
Current Day & Next Day radio button - The current and next day radio button appears for the employee who has a night/overnight shift that involves clock -in on the current day and clock-out on the next day. This button is specifically useful for the employee who is adding the overnight shift punches manually using the Add New punch button. Refer to the Add Next Day Punch topic.
-
Absences -The row displaying absences will be highlighted in yellow for better visibility. This visual distinction will help differentiate between paid/unpaid absences and punches. Refer to the Adding Absences topic.
Note: You can press the "Enter" key to insert a new time entry. When you do so, the time will be added, and a fresh time entry field will be displayed. To close a time entry field, simply click the ESC button on the keyboard or the "X" icon.
Viewing Rounding Type and Time Adjustments
The Clock In/Out table will display the actual time and the adjusted time. The total time will be based on the adjusted time.
- The hover will display the type of rounding. There are two rounding - Clock in/out rounding and Break Rounding. Refer to the topic Schedule Template.
- The Clock In-Out time is adjusted based on the In-Out time and Clock rounding, including the rules and advanced settings, set on the schedule template.
- Meal and Rest breaks are rounded based on the break rounding rules set on the schedule template. Refer to the topic Rounding in the Schedule Template.
- The actual time will always be displayed in brackets.
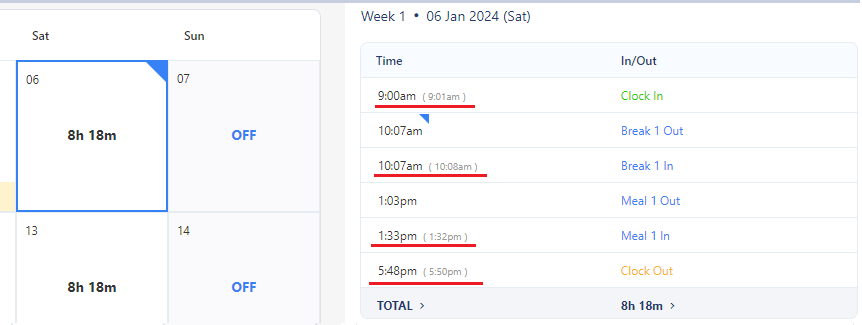
- The table will display the actual time only if rounding is not set for clock in-out time and/or for breaks."
- Example 1 - Consider that the rounding is set to 15 minutes in the "In-Out Rules" section on the schedule template.
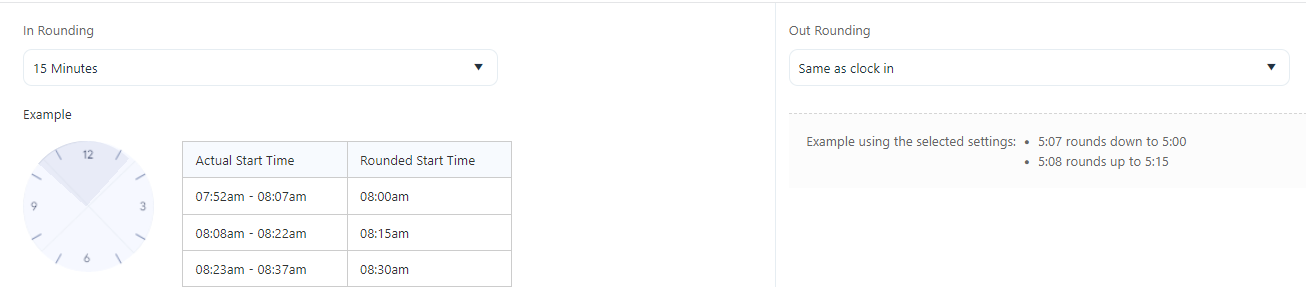
- The image below illustrates a Clock-In time of 8:23 a.m., which is rounded up by 7 minutes, and the adjusted time will be displayed as 8:30 a.m. When you hover over the time entry, it will reveal the type of rounding, which in this case is Clock In rounding
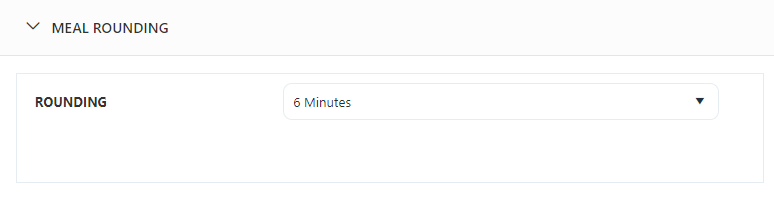
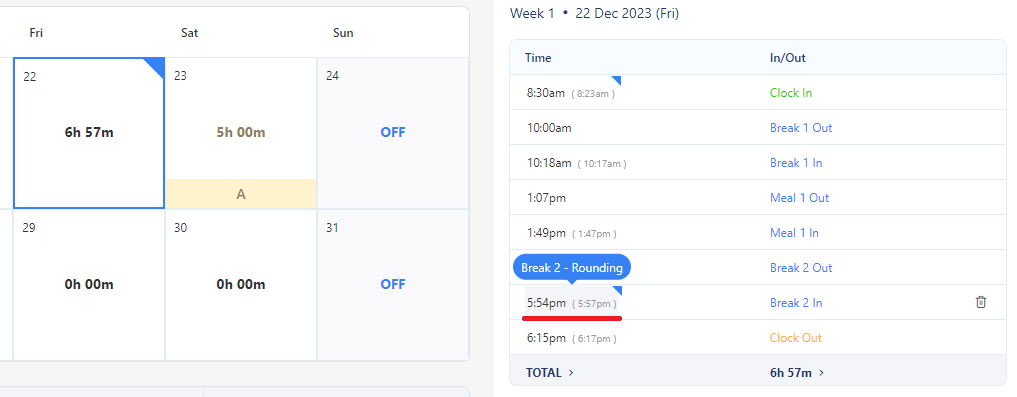
- Example 2 - Consider that the meal and rest break rounding is set to 6 minutes.
- The image below illustrates that the break-out time is 5:57 p.m.; it undergoes a rounding down process by 3 minutes, and the adjusted time will be displayed as 5:54 p.m. When you hover over the time entry, it will reveal the type of rounding, which in this case is Break 2 rounding.
Add Punch
The punch details are captured from the clock. A punch is manually added when there is a technical issue, missed punch, discrepancies, etc. The technical issues could be a malfunctioning card reader, network outage, or software glitches. A manager might need to add punch time manually to ensure accurate record-keeping.
Note: You can press the "Enter" key to insert a new time entry. When you do so, the time will be added, and a fresh time entry field will be displayed. To close a time entry field, simply click the ESC button on the keyboard or the "X" icon.
To add a punch:
- Select a date on the calendar. Consider that there are no punch details for the selected date. Note that if there are punches, then the Clock In/Out table will populate the time entries of the selected date.
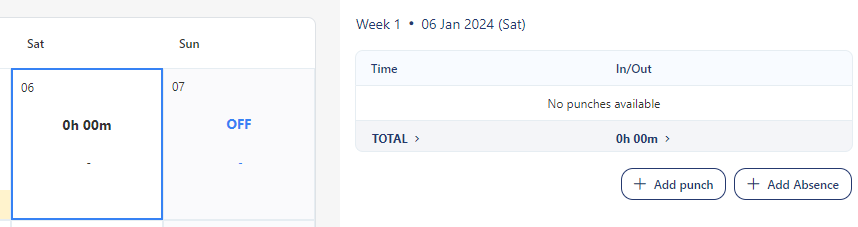
- Click on the Add Punch button.
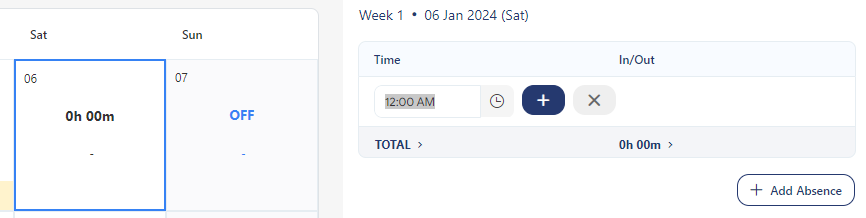
- Enter the time. Click on
 button to add the time.
The first entry will be considered "Clock In" time. The second entry is "Clock Out" time. If you add more, then "Clock Out" is replaced with Meal In- Meal Out", and "Rest In - Rest Out" time depending on the assigned schedule template and break configuration.
- Add the Clock In, Clock Out, Meal, and Rest Breaks.
- If there are an odd number of punches, a message will appear indicating the same and a missed punch symbol will appear on the clock in/out table.

- Add/delete the missed punch. The missed punch symbol will disappear once the punches are even.
Note that the missed punch will appear on the calendar only after the Missed Punch Alert Buffer duration settings.
- Further, if you edit or delete the punches, a blue mark will appear, indicating that the time is edited or the punch is deleted. In case of punch deletion, the edit mark will only appear on the calendar.
Add Next Day Punch
A next-day punch is required when an employee works in a night or overnight shift. The clock in /out table has a provision to add a next-day punch.
Note: You can press the "Enter" key to insert a new time entry. When you do so, the time will be added, and a fresh time entry field will be displayed. To close a time entry field, simply click the ESC button on the keyboard or the "X" icon.
- Select a date on the calendar.
- Click on Add Punch to add a punch.
- A switch Current Day - Next Day will appear over the time entry field. For the next day time entry, enter the time and move the switch to Next Day.

- Click on button to add the time.
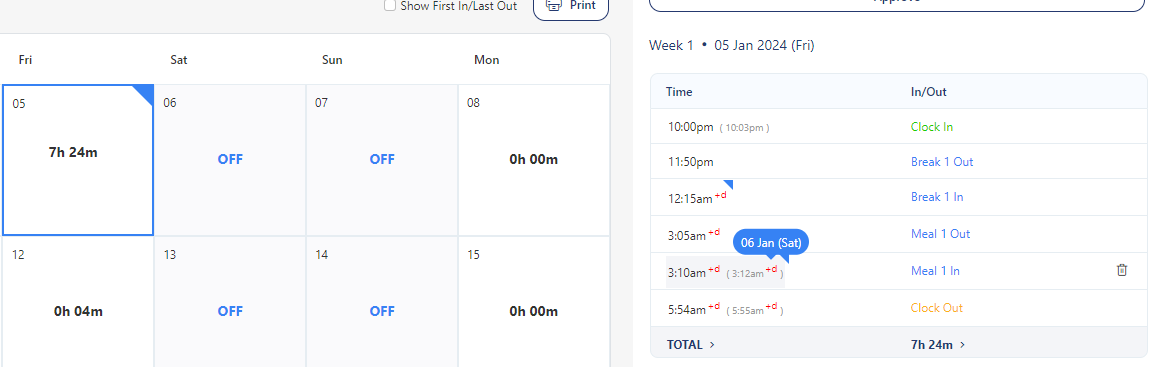
- On hover, it will show the type of rounding (Clock In/Out or Break Rounding) and on hovering over the +d sign will display the following/next day date.
Edit Punch
- Select a date on the calendar. The Clock In/Out table populates the time entries of the selected date.
- Click over the time that needs to be edited. It will enable the edit mode.
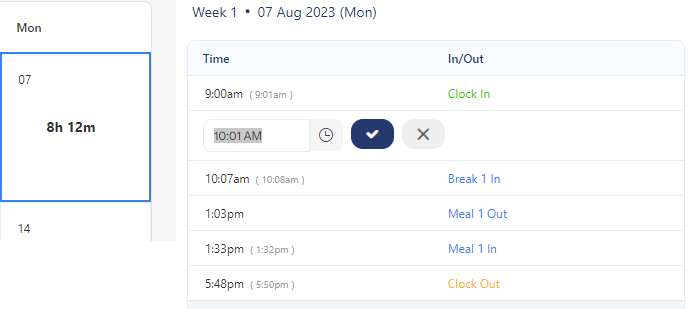
- Edit the time. Click on the tick
 button or click on the cross
  button to cancel editing.
- A blue mark will appear on the calendar once the time is edited.
Note: When editing an employee's punch details, the geolocation data (if available) will be displayed and remain unaltered. Changes made to other punch details do not affect the stored geolocation data.
Missed Punch
The missed punch will appear if there are an odd number of punches. The calendar will display the missed punch symbol once the specified duration in the Missed Punch Alert Buffer settings is elapsed. Note that the missed punch will appear on the calendar according to the Missed Punch Alert Buffer settings. It is the duration that you have set for displaying the missed punch warning after the scheduled out time.
To fix the missed punch:
- Select a day that has symbol.
- The Clock In/Out table will populate the time entries for the selected date. It will show where the time entry is missing.

- Click on Add New Punch button. Add Time.
- The missed punch symbol will disappear. Note that the edit symbol will appear on the calendar if you delete a time entry or add a missed punch.
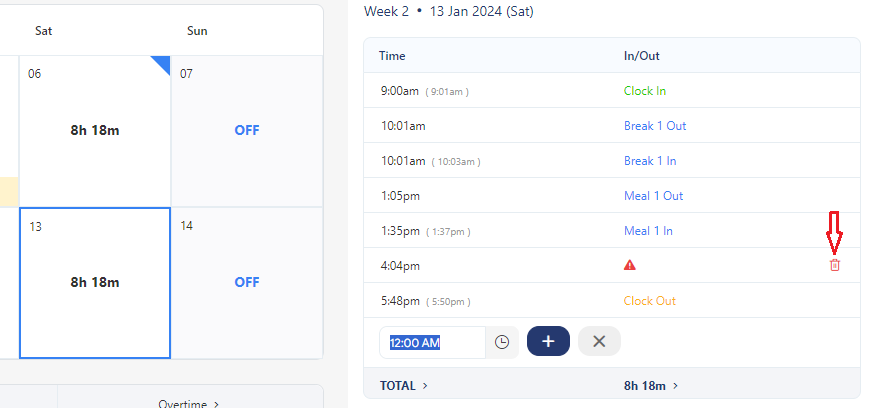
Delete Punch
The punch is deleted for various reasons, like removing an odd number of punches, incorrect or duplicate entries, system malfunction, employee requests, etc.
- Select a date on the calendar. The Clock In/Out table populates the time entries of the selected date.
- Hover over the table. You will see a trashcan icon next to each entry.
- To delete, click on the trashcan icon. On deleting the time entry, an edit symbol will appear on the calendar.
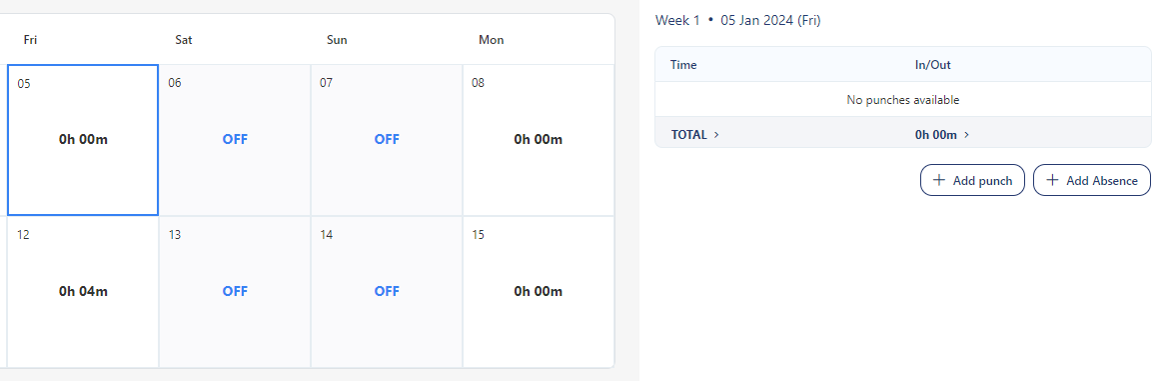
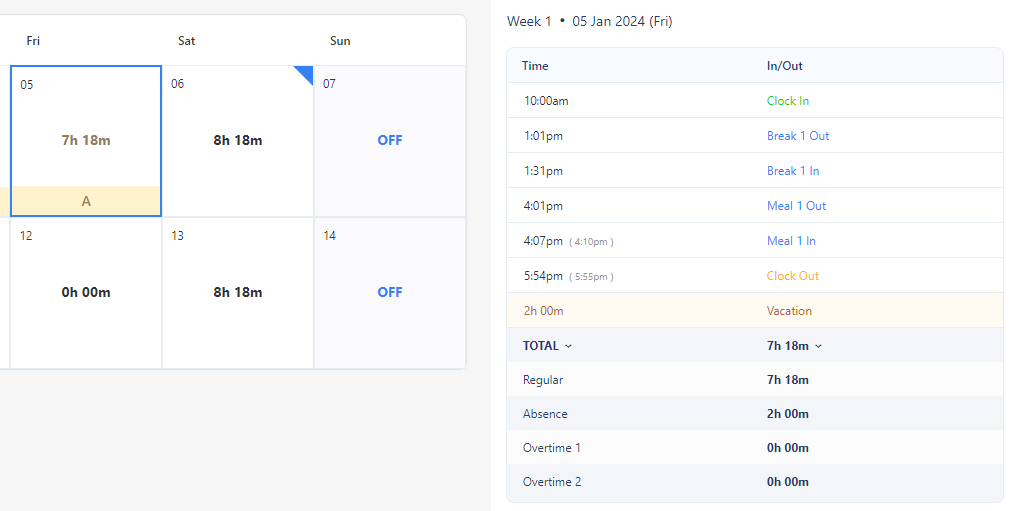
Adding Absences
Adding absences means recording an absence to an employee's timecard. You can enter the reason for an employee's absence, the time, and the absence code for a designated week.
Note: You must have the Absence Codes set up before using this screen and should have Timecards - Absence permission to add the absence. Refer to the topic Absence Codes and Permissions for more details.
- Select a date on the calendar.
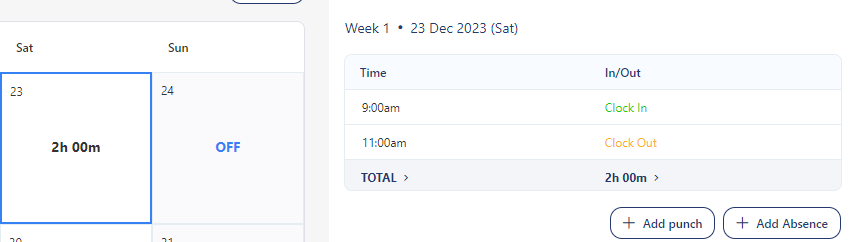
- Click on the Add Absence Button.
- Select an absence code, and add hours and notes.
Note: The time will automatically appear on the hour field if each absence has a default hour already defined. Refer to the Absence Codes topic for more details.
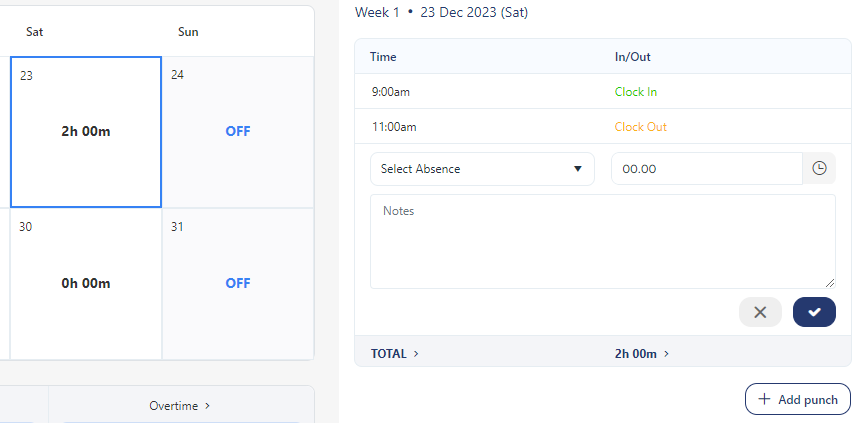
- Click on the tick button or click on the cross button to cancel.
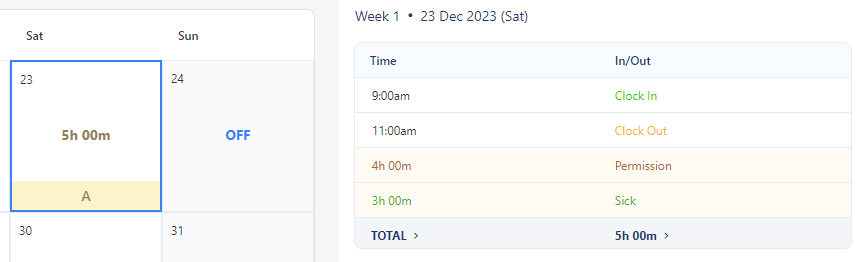
- The absences added will appear on the Clock in/out table and the calendar will display the symbol "A" showing that an absence is added. The system displays paid absences in green and unpaid absences in red (which might appear as brown) against a yellow background.
- To delete an absence entry, you will notice a trashcan icon appearing when you hover over the respective row. Click on the trashcan icon to delete the absence.
Overtime
The timecard will display the "OT" label to indicate that the employee is eligible for overtime based on the configured rules and the hours worked. OT stands for overtime.
- Overtime is configured on the Payroll Roles screen, and the employee is assigned a payroll rules. These rules define the criteria or conditions under which overtime is applicable.
- If the number of hours worked by the employee exceeds the designated regular hours, it triggers the overtime calculation.
- The method chosen for overtime calculation will determine how the overtime is computed.
Submit Timecard/Approve Timecard
- Approve - An Approve button will appear on My Timecards when only "Employee Approval" is checked or both "Employee Approval" and "Manager Approval" is checked on the New/Edit Employee screen.
- Submit - A Submit button will appear on My Timecards when only "Manager Approval" is checked on the New/Edit Employee screen.
An employee can self-approve their timecard and also submit it for approval. The Approve/Submit function is enabled when the following conditions are met:
- The timecards should have at least one pair of punch entries.
- There should not be any missed punches.
- Adding Absence will also enable the button.
- Additionally, the approval button will stay active despite adding and subsequently removing a punch from a specific day. This button will continue to be enabled, even if there are no punches on other days.
Note: A manager will be able to approve the timecard regardless of whether the employee submit/approve their timecard and when the manager approves, the status will be approved on the Employee's My Timecard screen.
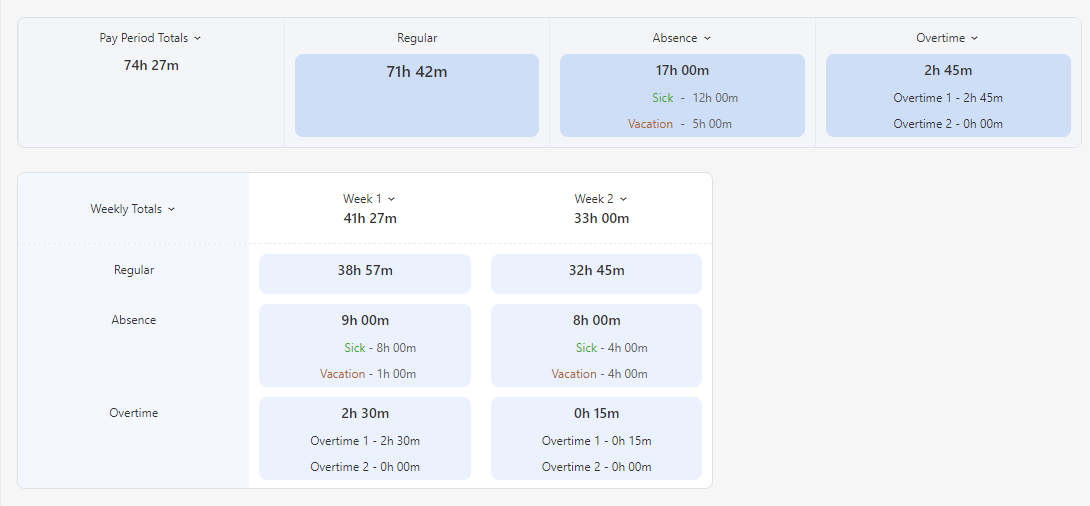
Pay Period Summary
Weekly Summary
The provided table presents a thorough overview of the accumulated hours for each week and the overall pay period. It also includes pertinent details like regular hours, absences, and overtime. By default, the "current" pay period is pre-selected.
It will display:
- Pay Period Totals - This section provides an overview of the hours worked during the chosen pay period. It shows the cumulative hours worked, including regular hours, overtime, and any instances of absences.
- Weekly Totals - This section will display the current week's total. This is beneficial when the pay period is bi-weekly, semi-monthly, or monthly.
- The first row presents the total hours worked for each week and the overall total for the pay period.
- The second row shows the total regular hours worked for each week and the cumulative total.
- The third row indicates the total absences for each week and the overall absence total for the pay period. Expanding the arrow reveals the type of absence and the logged hours.
- The fourth row presents the total overtime hours for each week and the overall overtime total for the pay period. Expanding the arrow reveals the logged hours for overtime 1 and overtime 2.
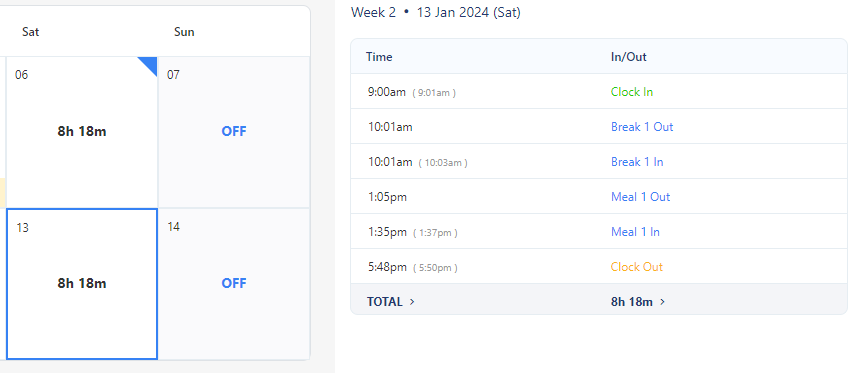
Daily Summary
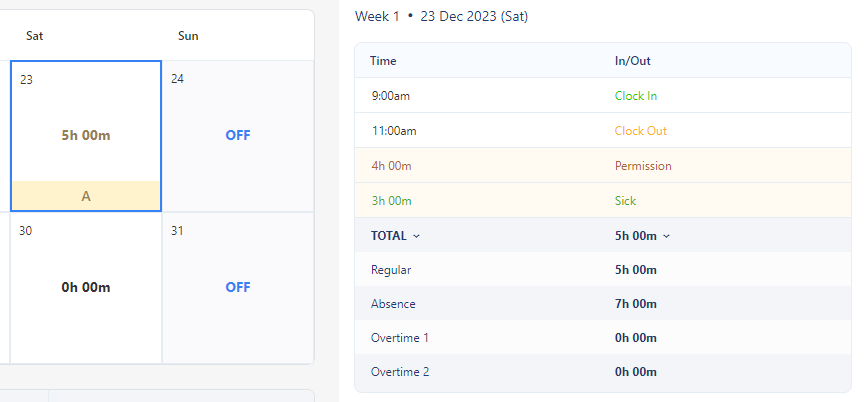
The Daily Summary is presented within the Totals section of the clock in-out table, offering a comprehensive snapshot of daily regular, overtime, and absence hours. Within this table, you will find the following information:
- Regular: This section showcases the cumulative regular hours worked during a specific day.
- Absence: It provides an overview of the total absence hours recorded for that particular day.
- Overtime 1: This section displays the aggregate of overtime 1 hours worked on the given day.
- Overtime 2: Similarly, it shows the total overtime 2 hours logged for that specific day.
Geofence
The Geofence feature records the punch location and notifies the user by displaying an icon and a message (on hover) on the timecard, indicating that the punch occurred outside the designated area.
Requirements:
- For the timecard to record geofence data, we recommend configuring both the "Capture Punch Geolocation - Web" and "Capture Punch Geolocation- Mobile" settings, specifying whether it's required or optional, and ensuring that permission to add location data to each punch is granted.
-
For accurate geofence tracking, employees must be associated with a site and/or address (which can be set up in the "Personal" tab on the employee screen). The address or site assignment plays an important role in determining whether a punch occurred within or outside the defined geofence boundaries.
To view the geofence information:
- Click on My Timecards.
Note that if an employee clocks in or out outside the geofence area on a specific day and time, both the clock in/out table and the calendar will display the geofence icon.
- Look for a geofence (
 ) icon on the calendar. This icon signals that a punch occurred outside the designated geofence area.
- Click on the date with the geofence icon to access more details.

- Review the Clock In/Out table to view the specific punch that happened outside the geofence. Hover over the geofence () icon to reveal a tooltip message: "View punched location from outside geofence."
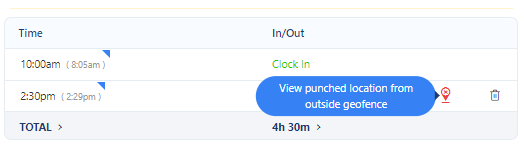
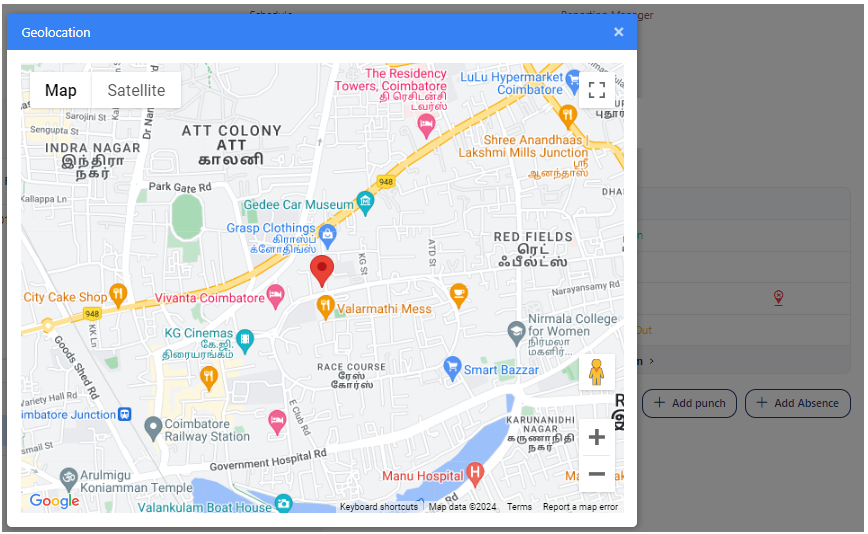
- Click on the geofence () icon on the clock in/out table to view the location on the map, gaining a visual representation of where the punch occurred outside the geofence boundaries.
History
The History screen allows you to view changes made to an employee's timecard and identifies who made those changes. All manual changes made to the timecard are recorded on this screen. The most recent change will be shown at the top of the list. The data on this screen is read-only and cannot be edited. Click on the History tab to view the changes.
Click on the History Tab.
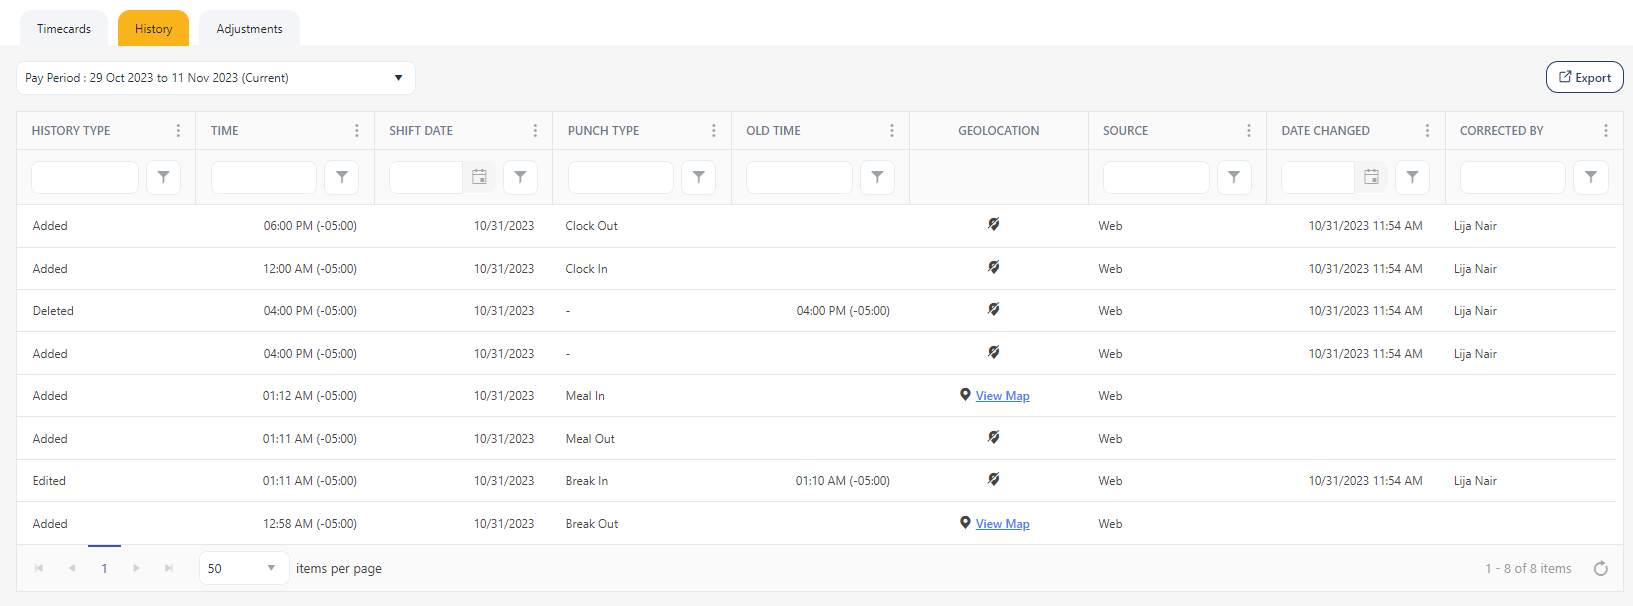
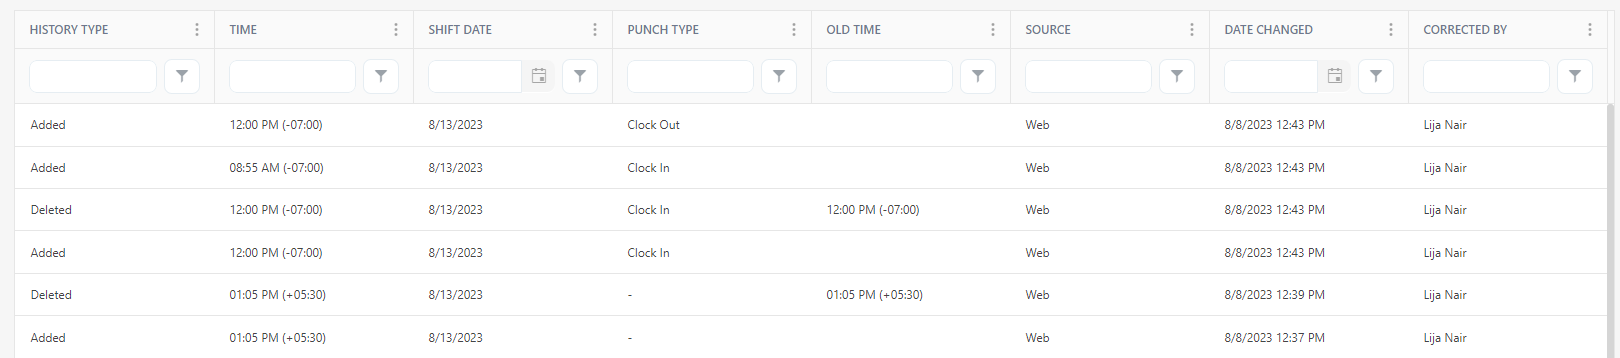
The screen will display the following details:
- History Type - Shows the actions taken on punches: added, edited, and deleted.
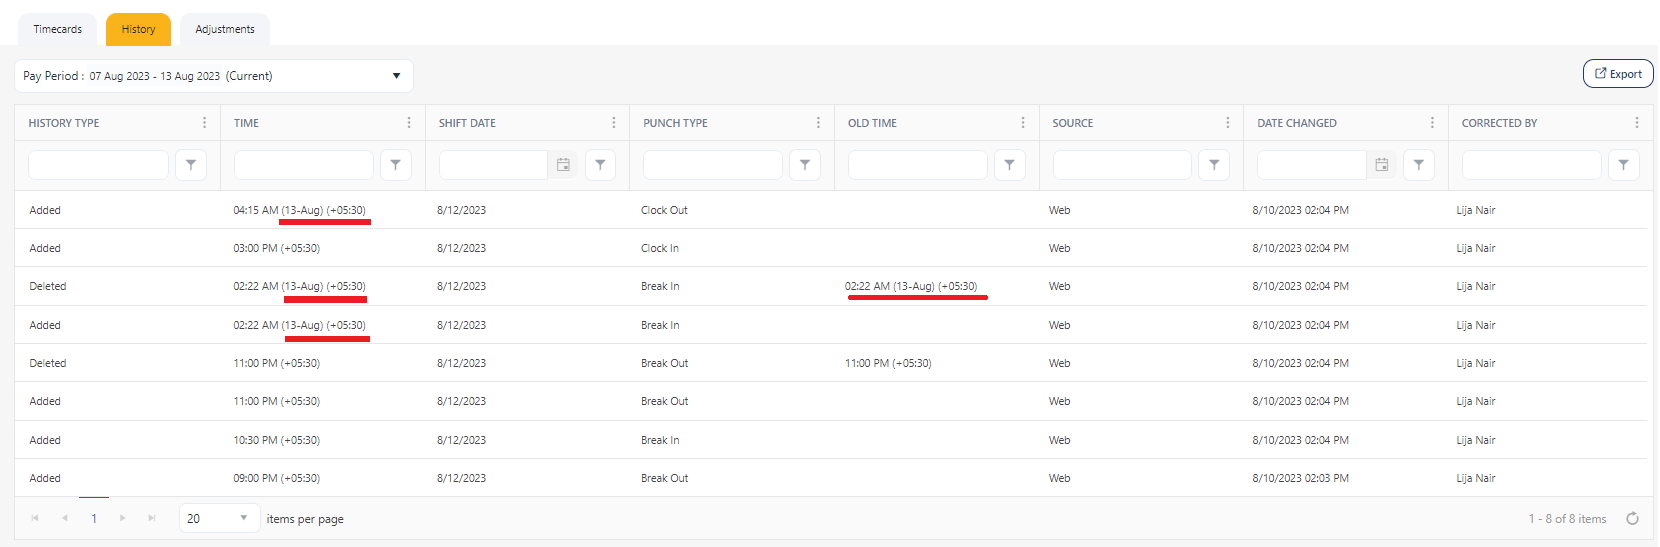
- Time - Display the added, edited, or deleted time.
- The time column will display the offset if the employee's time zone differs from the home time zone.
Note: The "Geo location" column is not selected in the column selector options. You can access this column selector by clicking on the three dots located next to the column heading.
- Similarly, it will show the day and date if the punch date is different from the timecard's selected date. This generally happens when a shift starts on the selected day and ends on the next day. Example: Night Shift employee whose shift ends on the next day.
- Shift Date - Displays the shift start date.
- Punch Type - Indicates punch types like clock-in, clock-out, etc.
- Old Time - It is the time that was corrected. This column will display the offset if the employee's time zone differs from the home time zone.
- Source - Indicates the source like web, mobile, clock, etc.
- Date Changed - The specific day when the time was adjusted or rectified.
- Corrected By - Name of the employee who corrected it.
- Geolocation - If the "Capture punch geo location" setting is enabled, and the employee has been granted location access, a View Map link will appear. However, a "No map" symbol will be displayed if location access is not granted or not captured. Refer to the topic - Mobile Settings and Capture Punch Geo Location on the web.
- Is Outside of Geofence - The status will display either "Yes" or "No." If the status is "Yes," it means the punch occurred outside the geofence boundaries. Conversely, if the status is "No," it indicates that the punch was within the designated geofence area.
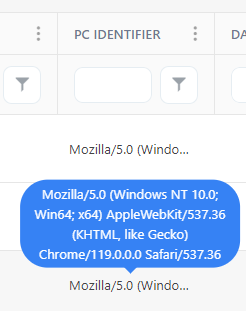
- PC Identifier - The PC identifier displays the employer's PC details from which the web punch was initiated.
Note: Please be aware that the three dots in the header offer an option to hide or unhide the column header that you do not wish to view.
Adjustments
The Adjustments screen will display the adjustments made while calculating the totals for this timecard. Adjustments are made based on the employee’s schedule and the rules associated with it. This includes Rounding and Automatic Unpaid Breaks. This is a read-only screen. These adjustments are subtracted from the Regular total displayed on the Timecard screen.
Click on the Adjustments Tab.
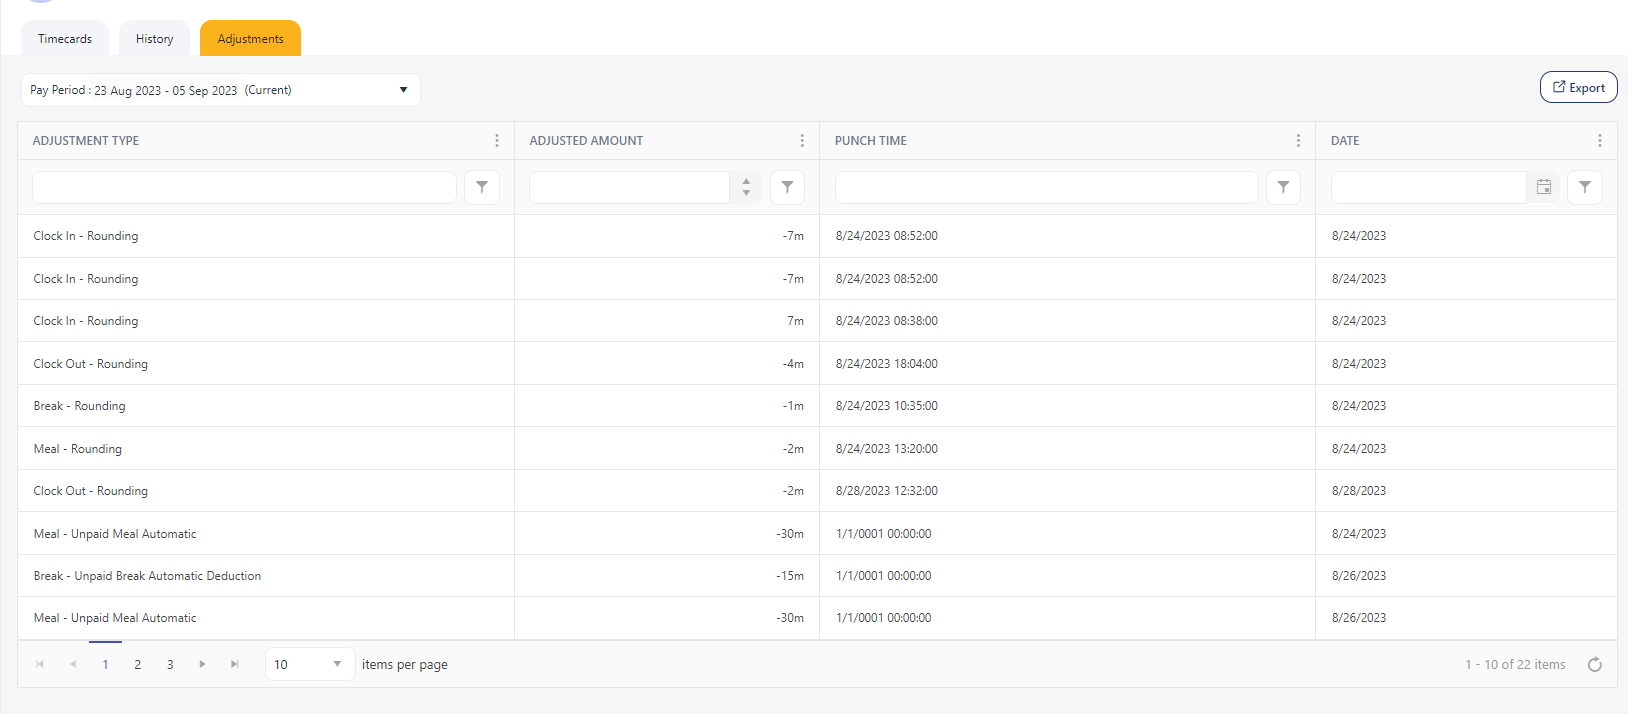
The screen will display the following details:
- Adjustment Type - The modification made in any of the following areas: clock in and clock out rounding, grace period, penalty period, meal & rest break rounding, and automatic unpaid breaks.
- Adjustment Amount - Displays the modified time in minutes.
- Punch Time - This shows the recorded time of the punch.
- Date - Indicates the specific date.
Note: Please be aware that the three dots in the header offer an option to hide or unhide the column header that you do not wish to view.